
I love it when the independent pattern companies release a new pattern! I also love sneak peaks and I was lucky to get one at the latest from Sewaholic, the Robson Coat, before most of you 😉

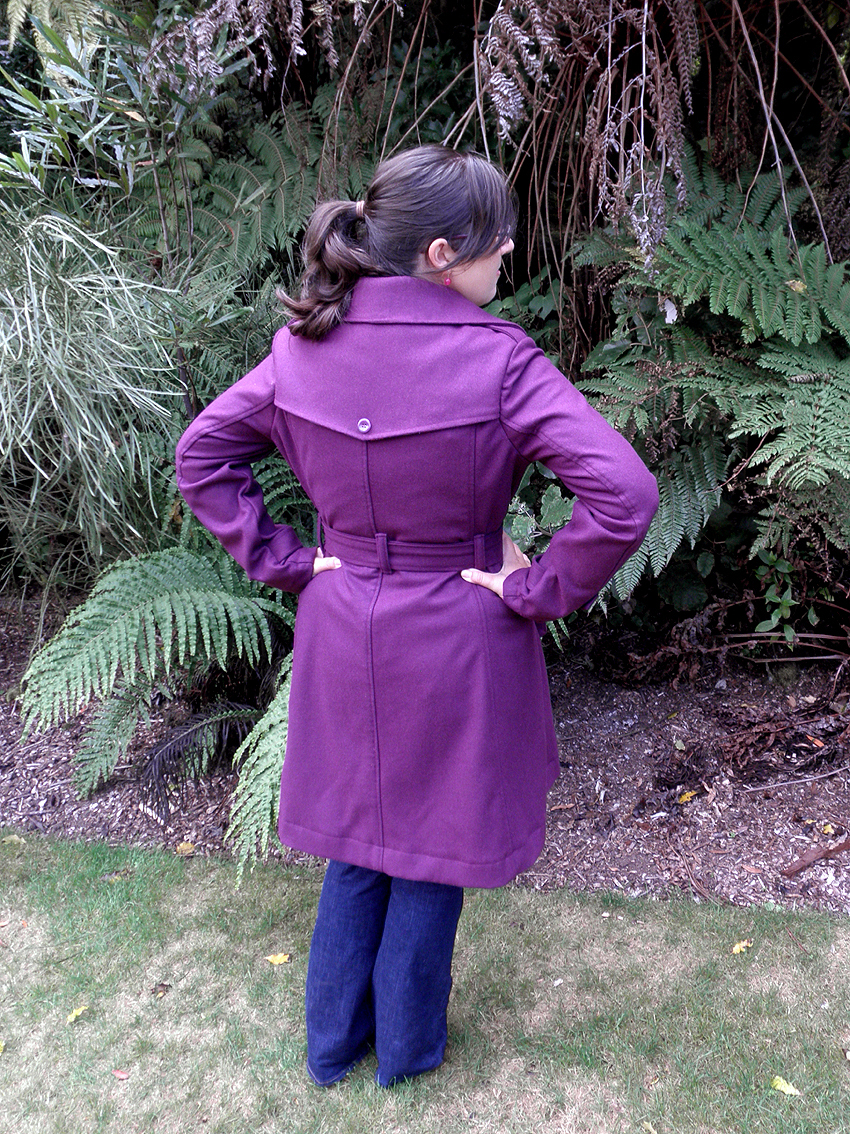
The Robson Coat pattern features everything you’d hope for on a trench coat, including front and back storm flaps, epaulettes, top-stitching, tie belt and sleeve tabs. It’s unlined to make it easier to sew, as well as easier to press the finished coat.
I was selected for pattern testing by Tasia and I was SUPER excited about this coat. As soon as I saw the line drawing I knew it was the perfect opportunity for redemption from the Gok Coat of Doom and rushed out to find the perfect fabric.
And I found it! But I have to say, I don’t think I have ever squeezed a pattern out of quite so little fabric!
Standing in The Fabric Warehouse with a 150cm wide bolt of wool under my arm and converting Tasia’s rough yardage (this is pattern testing) gave me 3.4 meters…I hrmmed, that’s a lot of fabric!
I wondered aloud to my confidant, the sales assistant, at the cutting counter. I said, “maybe I’ll just get 3.2m…it is based on the larger sizes and I am cutting a 12…”, Miss Confidant said, “If it was me, I’d just get 3 meters…” we discussed it further and I went with 3 meters. This fabric wasn’t cheap ($32/m) but I knew this coat was going to be luxe so I wasn’t too bothered, confidant in Tasia’s pattern drafting, in my head this coat was going to FABULOUS!
As you can see from the description the coat is unlined which makes it more beginner friendly.
I do just want to say: don’t be scared of linings! In their most simple form all you’re really doing is sewing a duplicate and sticking them together. Linings can be super fun, a secret (or not so secret) hidden touch to your garment. However, I can see exactly what Tasia was thinking as she drafted this pattern. Not only can linings scare newbies off of a pattern, they can also almost double your sewing time and a coat with this many pieces is already going to be a longer project than most.
So, for the Robson coat, you neaten your internal seams by binding them with bias tape which still gives you an excellent opportunity to embellish the internals. I can see a patterned outer with solid coloured bias bound seams or the opposite, and we haven’t even talked about contrast top stitching yet! The fabric (and thread) world is your oyster so don’t be afraid to experiment!
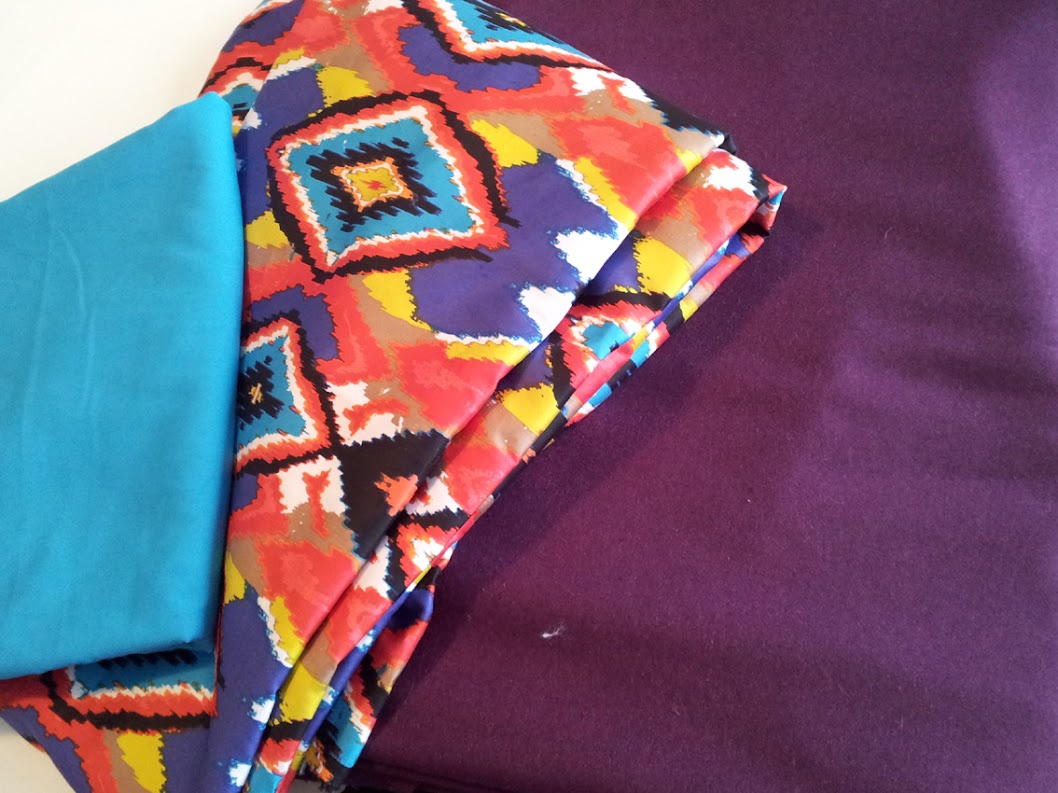
Me? Well I decided to take it a step further. I bought a solid coloured cotton in bright blue for my bias binding and then I grabbed that ridiculous ikat-esqe printed cotton.
Ridiculous in a good way.
You see, in Wellington, it gets cold. We don’t get snow (well, not usually!) but the wind, wow! It will freeze your bones from the inside out! The wool I bought is warm, but I already have a few warm jackets and cardis, I wanted warmer but I had absolutely no intention of drafting a lining pattern so I thought underlining would be a brilliant cheat.
I am a sucker for punishment, I can’t remember how many meters of bias I made but after I got to the sleeves I discovered it wasn’t enough and I had to make even more! (EDIT: I just checked and I made about 12.5 meters of bias, wow!) But, I am glad I made my own, I have never seen pre-made bias in the perfect colour at the shops! So has this project cured me of my bias addiction? Not likely! 😉

So much bias!
So, back to the shell fabric story: When I got home I cursed the stingy 20cm I’d left behind at the shop, because that was by how much my last pattern piece was over hanging the edge after a quick pin-and-check.
It was my own fault, I gave the final call for the scissors. Luckily I always pin every piece and check before I start cutting, that way if I am short on fabric I get a second chance to re-work the cutting layout. In this case, working with 3 meters of fabric, I had to pin a few pieces to my wool and then roll it up and pin some more…so I started unrolling and thinking…
…if I move the sleeves around…if took off all the little pieces…if I could just get all the long pieces on, maybe I can get away with just buying that extra 20cm for the small bits…

My saviour in the end was a combination of re-working the cutting layout and elimination. I decided to cut the underside of the back and shoulder flaps out of my underlining (I bought extra, because any leftover of that ridiculousness is becoming a skirt someday), it would be a cute little secret pop of colour that might give a sneaky show as I move or they get caught in the breeze wind and also help counter the extra fabric thickness.
Hey it was my jacket, I was just hoping Tasia would appreciate my creativity! 😀

All-in-all I cut the following pieces out of my underlining fabric:
- 2 – Back x2
- 3 – Side x2
- 4 – Top Sleeve x2
- 5 – Under Sleeve x2
- 6 – Back Flap x1
- 7 – Front Flap x2
Then I basically stitched up the pattern as per the instructions, treating my shell fabric piece and it’s matching underling piece as if they were joined wrong sides together as a single piece. You should really baste them to each other but…well…I might not have done that 😉

Time constraints meant I do not have any more progress shots and since it was summer, the trying ons were quick and clammy! In fact I only survived because I have this bad habit of sewing in my underwear…don’t lie, you do it too! So I knew straight away this coat was going to be a winner against the winter winds!
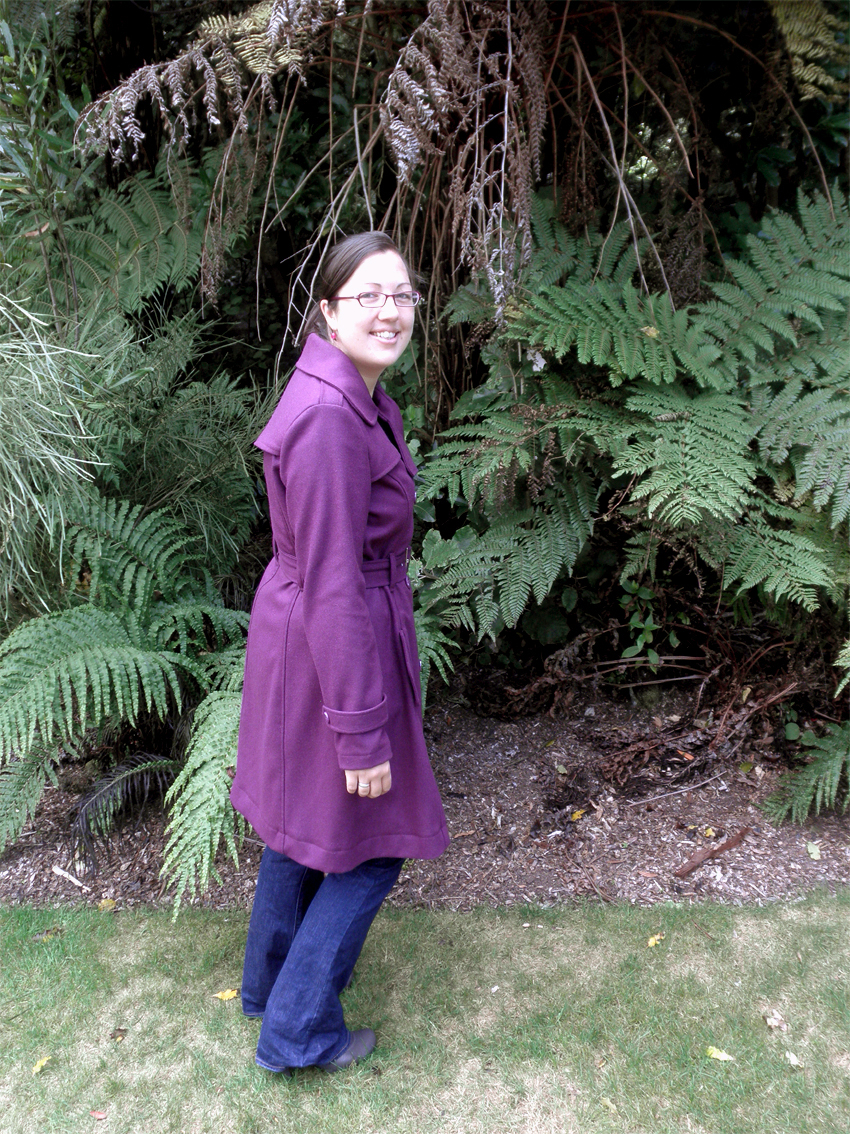
Ok, enough words? Agreed! Here it is:

I decided to make a proper belt for my coat, something about the tie belt coupled with the thicker fabric of my coat made me feel like I was in a bathrobe.
You can make your own belt too, just cut one angled end off of the belt piece, then you just need a buckle and some eyelets. It’s fun because you get to use a hammer.
I also used 1 inch buttons for the front of my coat, and 3/4 inch everywhere else – I just preferred the proportion of the bigger button on the front.

I will say (and Tasia has said) that this pattern really should be made from a much lighter weight fabric than what I chose to work with. My wool was probably already pushing the boundaries and adding the underling, well, let’s just say it didn’t make it any easier! There were times when I questioned if I’d get it finished and wondered what the heck was I thinking but I got there in the end and I am super happy with the result.
Click an image to view the rest of the gallery:


Thinking about making this coat in a thicker fabric too? I have some I-am-not-an-expert tips.
The Curious Kiwi’s tips for sewing in the thick:
- Make a test swatch – I did a test seam with two pieces of shell fabric underlined, then I sewed my bias tape to the seam, folded it over and top stitched it, just like the real coat. I also tested my interfacing and before I started my button holes. Use scraps of your fabric and double it up to simulate how thick the real seam will be to see how it goes. This is your chance to fiddle with the tensions to find the perfect stitch.
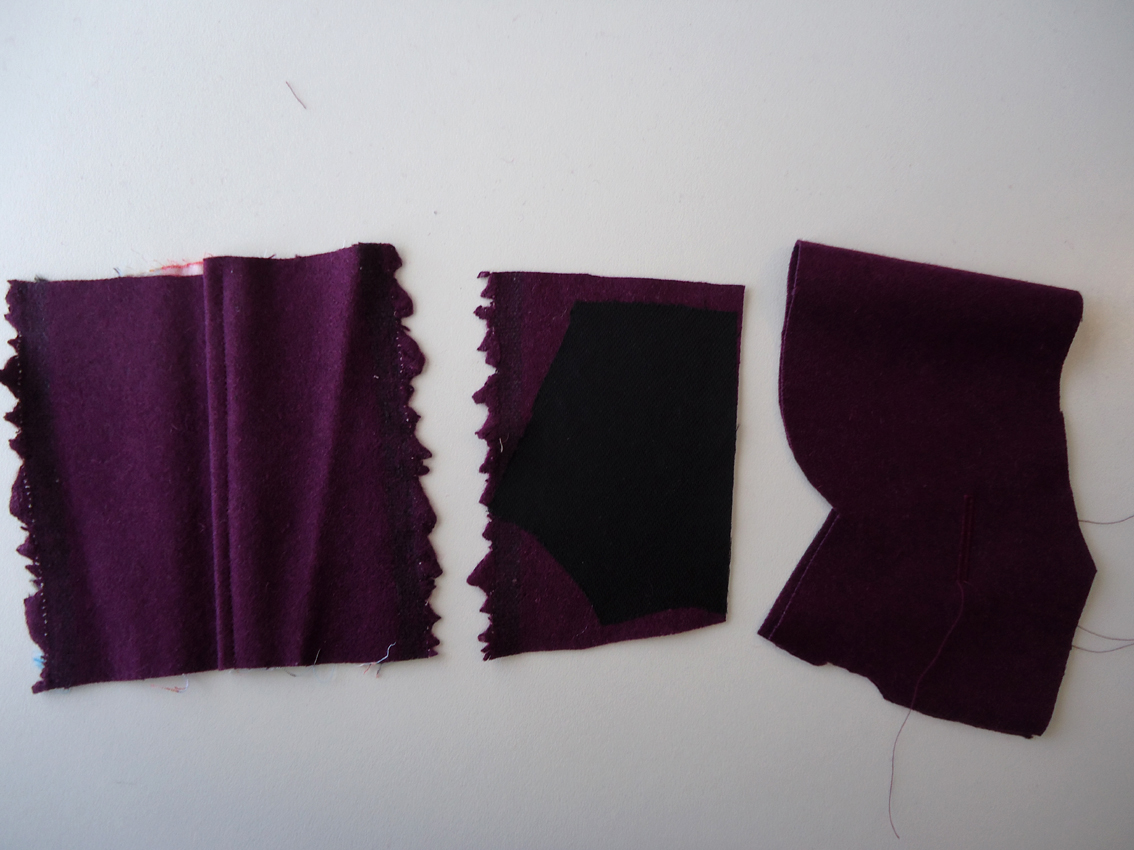
L to R: Top-stitching a full seam, interfacing test and a button hole

L to R: Full seam test (inside), and cut button hole
- Let the machine eat the fabric at its own pace. Sometimes you do need to gently help it but you also need to remember to let the feed dogs do their own thing.
- Most of us know that loosening the tension also helps your machine sew through multiple thick layers, but so does lengthening your stitch.
- Use a brand new needle, nice and sharp!
- Use your appliqué foot, it is clear so you can see through it and the split is off-centre, that stops the edge of your bias from folding up into it as you sew.

Appliqué foot on the left, regular foot on the right
Thank you Tasia for another amazing addition to your pattern range and for the opportunity to test it for you.
I wish I could do this for a living!
The deets:
Pattern – Sewaholic Patterns Robson Coat 1301 (testing phase), size 12
Fabric – Shell: 70% wool, 30% Viscose. Underlining: 96% Cotton, 4% Lycra/Spdx – The Fabric Warehouse, Wellington. 100% cotton poplin for the bias – Spotlight Ngauranga
Other notions – Belt buckle & eyelets from Made Marion, Wellington. Buttons (1″ & 3/4″ plastic 4-hole) from Pete’s Emporium, Porirua. 2 x 150M spools Mettler thread, col. 0580 from The Fabric Warehouse, Wellington
Photos – Nerdy Husband at Wilton Bush, Wellington
Something a bit Nerdy:
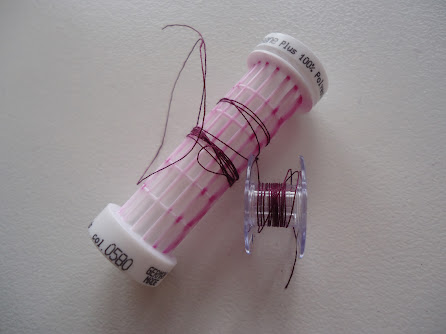
Has this ever happened to you? Almost at the end of the project and: eep! Thread spool starting to show through.

This was my view as I was about to start top stitching the belt – my last bit of sewing – oh and one button that I had to cut off and re-attach – kind of sewed that puppy right through the pocket lining, oops! 😉 Anyway, when I see the thread running out for some reason it makes me sew faster, as if I can out-sew the quickly disappearing thread. Do you do that too?
This is all I had left by the time I was 100% finished 😉
The Nitty Gritty:
I read lots of blogs and I love hearing stories about how an item was made from thrift store fabric for $2…or the fabric was a gift so the total make cost was $0. I don’t have stories like that but even I’ve managed to make a silk blouse for $10 and another for $20, I mean: SILK!
Sometimes sewing is a cheaper option, sometimes it is not.
That said, I don’t sew to save money. Sewing is my creative outlet, it’s fun, it mentally balances my life and it’s also a great way to make new friends who don’t roll their eyes as you veer off towards the fabric sale sign when walking down Willis Street.
So you are probably guessing that I am about to tell you: this coat wasn’t a “cheap” make.
Total for fabric, buttons and thread? About NZD$160.00
But it’s all about how you look at it – check this out:

I spotted the coat on the left in the window at David Lawrence on Lambton Quay last Wednesday, mostly due to the colour, but they also have the coat on the right, which is pretty much the same style as mine. Both are made from 90% wool/5% cashmere/5% nylon and lined in 55% polyester/45% viscose.
Want to guess how much either of the DL coats above will set you back? NZD$560 each- yep, that’s FIVE HUNDRED AND SIXTY DOLLARS!
My coat’s looking pretty darn cheap now huh?
Oh but I should say that the DL coats are on special right now, NZD$450. I still don’t think the term “bargain” is applicable, but I guess that’s , umm, less?
And The Curious Kiwi still wins 😀


Pingback: FO: Lined Robson Coat | little grey hedgehog
Pingback: Robson Coat Sew-A-Long | Sew Lyrically Vintage
Your Robson turned out beautifully. I am awaiting the arrival of mine. Really, from what I am reading online no hurry ’cause it’s going to take a while to afford to make the thing. I am so pumped about it too. Maybe, oh maybe I will stumble upon some affordable fabric so I can get busy with it.
Thanks for the share here.
Cheers,
Lyric
http://www.sewlyricallyvintage.wordpress.com
Thank you! 🙂 It does need a lot of fabric but it’s the style of coat that you’ll wear forever, a wardrobe staple, so I think if you are going to spend up on fabric for an item, this is it! Happy sewing xx
I’m came across your Robson because I was reading up on it before I start my own! I love your coat and I actually want to make it in the same exact color! I love how yours turned out! 🙂
I just purchased this pattern and found your site in the process…. that having been said, you are one fantastic seamstress!! Your coat turned out beautiful and it looks beautiful on you, too. I envy your skills….Anyhow, I love your site.
Aww, thanks so much Tamar! Glad to have you reading xx
Hi there, I was looking to make this coat and came across your version after looking at scruffy badger’s. I love the both versions!!! As you used wool for yours – how did you pretreat/launder your fabric, prior to cutting out your fabric??? I have wool, but I am scared to do anything with it yet, for fear of felting it!!!
Hi Tanya…I have a confession 😉 I didn’t pre-wash my wool, because if I ever need to clean this coat I will send it to the dry cleaners. There are lots of theories for pre-washing, personally I pre-wash my fabric however I intend to wash the final garment, mostly this is by top-loader machine because that’s how I roll 😉 I do hand-wash really delicate fabrics and lace but even most silks (if I am really honest) are fine in a lingerie bag chucked on their own in the washing machine on “gentle”. I suspect this wool would have felted in a normal wash or even a hand wash so I took the gamble, a dry clean shouldn’t affect it at all. For coat fabric I often don’t pre-wash because all my coats are only ever dry cleaned when needed. I hope that helps 🙂
Pingback: Robson trench – day 2 progress | Is it fitting?
I know this is an old post, but I just wanted to say that I have been eyeing a lot of Sewaholic’s patterns, and after seeing your results with this one I am sold on the awesome ness of her patterns. Thank you for sharing your work, that is an awesome coat!
Hi Morgan, I am happy I helped inspire you to try Sewaholic patterns, her drafting and instructions are really great. I am thinking about trying her Thurlow trousers soon 🙂 Thanks and happy sewing
You are one brave lil’ lady, I have never felt confident enough to try and sew up a coat. I would love to though, and yours has turned out so brilliantly! I;m sure you will get a LOT of wear out of it 😀
and yes, I do sew in my underwear 😀
xxx
Congratulations! Fantastic coat. What beautiful sewing. Bring on the cold weather!
Lovely lovely jacket! The color is just great. And I have to say, I find it mightily satisfying to be able to finish a project and have mere scraps of fabric and thread left over — especially when the fabric is expensive!
Thanks Nicole and what a great way to look at it! With the smallest of scraps left over I really did get my perfect fabric/thread/pattern ration 🙂
Love this!!! The fabric combo is AMAZING!! So inspired!
I really love your version of this coat. The coat has been on my wish-list ever since the pattern came out, but m going to make it after the summer. Your version is awesome, and I guess I will be underlining mine too, even though cutting fabric is my least favorite sewing-task…
I go back and forth between loving cutting out and hating it…I have to be in the right mood and sometimes it can be quite relaxing but there is a lot of cutting for this coat, especially if you do the underlining – but is it so worth it! Good luck, come back to ask me questions if you like xx
I LOVE your coat!! And man, so glad it worked out with enough fabric AND thread 🙂 ( living on the edge!). The colour is AMAZING!!! Well done!
“On the edge sewing” 🙂 maybe that should be a new category for my blog, I seem to teeter there often, hehe
Absolutely gorgeous coat!! That underlining is fabulous. I love your writing style too; great read!
Aww thanks! I thought I wrote a bit too much at first but I really wanted to tell the whole story, thanks for reading it all! 😀
Totally love the purple… you have done an amazing job.. I am waiting for my pattern to arrive here in Sydney and was thinking that I would really like to line it.. This post will help immensely.
stephanie
in-my-backyard.net
I’m glad I could help and inspire 🙂 Good luck for your version xx
I’m SO impressed it’s beautiful and you’re SO talented – well done
I love the colour! And the lining. Such an awesome coat, will be in the works one day. Thanks for the tips and although it may seem “expensive”, coats in the stores are definitely overpriced! 🙂
Oh yes, I agree, and I am sure my fabric is much better quality that the store bought one too! 🙂 Good luck for your coat xx
This is fantastic! As the weather cools I’m tempted to make one with a flannelette underlining
Oh flannelette would be so cosy, please do it 🙂
That looks great! I love purple, fav colour:)
I always sew faster too haha.. that is perfect amount of remaining thread tho 😉
So true, better to have a little left than waaay too much, I feel like I got my exact monies worth 🙂
What a fabulous coat and love the idea of interlining, think I will definitely order this pattern now. Thanks for sharing 🙂
I really like your colour combination and the fact you pushed the boundaries with this pattern. I know what you mean by the bone chilling wind in Welly, we get that too in Christchurch. I am keen to try that pattern too but maybe for spring!
Another Kiwi sewing blogger yay! 🙂 Oh yes, I think the whole of NZ suffers from those fresh Antarctic winds. This coat would be great for a Spring pick-me-up, I’d love to see someone try it in a light weight waterproof fabric, something funky. I’ll keep my eyes open for it to pop up on your blog 🙂
What a great coat! So happy to hear you used fabulous cloth. I remember Patti Palmer,s instructions to sew with the best possible cloth way back in the 80s. Like you showed, you want to create a garment that rivals the really high end clothing-not thrift store remnants. you did just that. It takes just as long to work on each-the expensive cloth and the bargain basement cloth, but the satisfaction that comes with such a beautifully made coat out of quality fabric has no equal. Congratulations all around!
Thank you Maggie,t hat is exactly how I feel 🙂 Using the best quality fabrics always makes me love my garments more and they last so much longer too xx
Gorgeous coat! Great fabric choice even if it did make it difficult.
I’m going to follow you now! Love your blog!
Thanks Funnygirl – looking forward to seeing more of your sewing too 🙂
You’re coat is absolutely lovely. I have my pattern and all my notions ready to start. The plan is to do a tiny bit every day and get it finished by next week. I’m not saying it’s possible, but I can at least try 🙂 I was thinking about partially lining mine with fleece, as it’s Spring here but it can still get very cold, especially mornings when biking to work. I was thinking about making the lining detachable and now that I see yours I’m also thinking about adding underlining just so it looks extra nice 🙂
I was just wondering how much fabric you used for the underlining and the bias tape, because I always tend to buy to much (I bought 5m of gabardine for the outer shell, whoops)
The great thing about this kind of project is you can take little bites each day and still see fun progress to keep you interested, good luck, it’s such a great coat!
I can’t remember how much fabric I used for the underlining because I bought about 4.5 meters with the intention of using the left overs for another project. I think maybe I used 2 meters, not nearly as much as the main coat, I didn’t bother to pattern match it. For the bias I made 12.5 meters (omg, I couldn’t believe it when I counted it up, if I had worked it out before hand I think I would have been overwhelmed – the trick is to make it all in one go so you can get on with it) and I made that from about 1.5 meters of plain cotton – I have some left over but that’s because you have to cut it on the bias, it feels a bit wasteful but totally worth it and I can use my left overs for other projects 🙂
I love your coat. I’ve wondered about making it in a heavy upholstry fabric – something for fall. I love the belt you added, it really looks sharp. (And I can’t believe the prices in New Zealand! I thought Canadian prices were high!)
Hi Nothy, oh yes, please give the coat a try, I think a cute upholstery print would be great, just do a few test swatches first to make sure you machine can handle it and to find the perfect tension/stitch length but if I can do it, then so can you! 🙂
this is amazing! I am in the process of buying the bits and bobs for this coat!
Thank you so much!!
Bundana x
http://www.bundana.blogspot.co.uk
I love this post as it has 3 of my favourite things: purple wool – THE best fabric, a trench coat – a true Classic, and Otari – where I spent many wonderful afternoons with my Grandma. I remember telling her that I hated Conifers and she told me that my favourite tree, a Rimu, was a conifer. I love this memory – Thank you! Your coat is wonderful – I hope it keeps you warm in the wind tunnel AKA Lambton Quay this winter.
Ahh spoken like a someone who knows Wellington well!
Thank you, I am almost (almost!) looking forward to the cold winter to test it out and I think I’ll be the warmest purple blur zooming down Lambton Quay on my way to work, hehe 😀
This is an amazing trench Mel, very professional looking, I love it, and aubergine is one of my favourite colours. I’ve been drooling over this pattern since it’s release but am unsure I could do it justice, although ‘just in case’ have made preparation with 6 mtrs of a thickish stretch cotton drill whilst Textile Traders have their 40% sale. Maybe if I stare in awe at yours long enough it’ll will magically happen.
Thanks Deb, I hope you will give it a try, it’s such a nice pattern and the bias seam binding is a really fun touch. I think you will do a fabulous job, looking forward to seeing it xx
That is one absolutely fabulous coat – gorgeous! And enjoyed the story behind it, thanks for sharing 🙂
Great job! Love the color and style – you are a pro!
Wow, that is one special Robson, I love everything about it and think you’ve done agreat job at making it so special….the lining is delicious and the colour of the wool….adorable. Fab and inspiring! Thank. You for leading me to your experience too:-)
Nicely done! The colour really suits you. I’ve been hanging on to a magenta twill denim for yonks now waiting for the weather to go cold, so this is good inspiration for me to get off my @$$ XD
Thanks, the first coat I made I “settled’ on the fabric colour, it wasn’t quite right and I never got really excited about it so I was super happy when I saw this wool, it was exactly what I envisioned 🙂
Wow, your coat is fantastic! I love the color, and it looks great on you. And I love the belt! Really good idea…I might just have to change the tie on my coat to be a real belt too. The underlining is a great idea too. I’ve been waiting for the weather to warm up a bit to wear my coat – perhaps I’ll have to sew another one (in my spare time, ha!) with an underlining for winter weather.
Wow congrats on a beautiful beautiful coat! Love the colours.
Thank you xx 🙂
PS I hope you said yes to Tasia??!
Oh wow that is one fantastic coat – lovely lovely finish and colour and the lovely inside with the flashes of colour. Just perfect. Suits you and looks expensive too. Way more than c$500+. Definintely.
I’m one of those weirdos who buy more thread than I need cos I expect to right royally muck up my makes which means unpicking and re-sewing. I do make a ton or mistakes and reworking is done but end up with lots n lots n lots of left over thread. I’ll learn or run out of budget. Probably the latter 😉
Haha, yes, thread, it’s one of those weird notions we have to buy and who knows how many meters we’ll need? There is always waaay too much left over of a weird never-sew-again colour or not quiet enough to use for a whole new project, gah! 😉
Thank you…and yes, of course I told her yes! 😉
Then again my kids still don’t mind weird mis-matched thread on their mummy made stuff so I have an outlet for now. Give it a few years and then I won’t mind mis-matched thread on my stuff lol.
I Love it!!! And hot-damn it looks good on you. Cosy warm AND stylish, you’ll be this winter! Nothing much makes me happier than a seriously eye-ball catching bright-as-day lining, and that aztec-y print is such a great pairing with the purple. I’m nodding in agreement over the belt too – definitely worthwhile going to full treatment as it’s little details like this that really lift a garment from home-made to hand-made. You look awesome in it!!!
Wow, thanks! 😀 I do feel so stylish in it, it’s the most luxe thing I’ve made in a while, I am really proud of it.
This truly is exquisite, well done! I really must get some outerwear done this year, I’ve been planning it for ages, but somehow I know it won’t be this amazing!
Aww shucks 😉 xx Outerwear sewing is kind of fun, the projects take a bit longer but I feel like all my coats last longer too, I guess because I don’t wear then as often as a blouse for example. With some WSBN help your outerwear will be amazing too!
Wow, this coat came out great!! I’ve seen a few others stitch it up for the pattern testing and liked it. Really LOVE your lining. You did a great job, looks so professional.
I’ve just been on the hunt for more pattern testing posts, I love all the ones I’ve found so far, so much inspiration!
This is awesome. Love the colour with the bright lining
Thanks! 🙂
I love your version and the fabric selection. I can so relate to the fabric shortage. When the pattern was released I immediately ordered the patterns and went fabric looking, and found just what I was looking for. My pattern arrived just last week so off to Global Fabrics on Thursday to get some interlining and fabric to make bias binding. All set Thursday night I start to layout the pattern on my fabric only to find I don’t have enough!! Just .5m short! I’ve decided to put project on hold until shops open today and get more! Beautiful jacket – love your belt.
Oh no! Would it help if you cut the underside of the flaps from a contrast fabric from your stash? Hmm, that might not be enough, 0.5m is a lot short. Bummer, but at least you can go get more 🙂 Ohh I am excited to see your version!
You should come along to one of our Wellington Sewing Bloggers meets, let me know if you are keen, I’ll give you some more info, we have a lot of fun, promise 🙂
Yay! I lurve this coat and I feel really lucky to have had a quick try on too 🙂 The colour is amazing and the fit is perfect. I reckon this will be fab for the Welly winter winds.
Hehe, I am almost looking forward to one of those typical cold days…well, maybe not, they’ll be here soon enough 😉
Job well done, and who cares about how much it cost to make. You enjoyed making it and it looks a million dollars. 🙂
Oh exactly! I am happy, that is all that matters, and no one else will have a coat quite like mine 😉
This is insanely gorgeous. Amazing work.
Thank you 🙂 xx
This is stunning! What a beautiful, unique coat! I absolutely love it! Well done, you!
Thank you, it felt like such a long project, I am so happy it worked out 🙂
Cooooool!! That’s one fantabulous coat!!
Thank you xx 🙂
Swoon! Love! The colors are AMAZING. The inside underlining makes me want to dance about with happiness. This will definitely tempt me into picking up that pattern…
Dance, dance away 🙂 I think you should definitely give this pattern a try, it’s a long project but worth it, trench coats are a wardrobe staple and so versatile.
Those colors are amazing, great job! The underlining really puts the coat on top
Thank you I love coats with amazing linings, it makes them so much more fun!
I am struck with coat envy. I want a purple coat just like yours. It is fabulous. I also want a cool ferny spot for the photos, but that may be harder to come by 😉 Great job on your coat.
Aww thanks 🙂 You can tell when I am super proud of a project, I make an extra effort to find somewhere pretty for the photos 😉 Go on, make yourself a pretty purple coat too!
What a gorgeous coat! You can be very, very proud of yourself!
Thank you 🙂 xx
Wow!! You have really inspired me to have a go at this coat. Your’s looks awesome!! Thanks!!
Awesome, I hope you do give it a go 🙂
Funny you should say that about thread running out. I’m just in that situation myself, although in my case I am going to have to go out first thing tomorrow for more of Gutermann 387 (hey, it’s for my “like yours but not so colourful” bird fabric). I do not have enough thread for 11 buttonholes. It will annoy me though to have nearly all of a reel left over.
Back on topic, your coat is fabulous and expensive-looking, you should be very proud! I like your fabric choices. I also like how you did your name tag.
Ohh I’d love to see your birdie fabric project when it’s done 🙂 I usually have lots of thread left over too, I just add it to the box, hopefully I need that colour again another day 😉
The birds are now screening on PatternReview 🙂 Simplicity 2339.
Oh, how excellent to see this finished. Definitely love what you’ve done with the underlining, thanks for sharing the details on which bits you underlined. The belt is a great touch that really finishes it off nicely too. 😉
Phew I’m glad it’s finished too! Was a bit of an epic make, long projects make nervous.
The finished coat looks great. I love the pop of colour inside. This will definitely work in Wellington winter winds. Well done.
I hope so, I am kind of looking forward to giving it a proper test…but I am sure the biting winds will be back soon enough, no need to hurry them along! Haha
What a fabulous colour and a gorgeous coat. I love the secret colours inside!!
Thank you 🙂 I love coats with amazing linings, it makes them so much more fun!
well done an excellent make and the underlining is a fab touch. A great review
Thank you, I’m glad I added the underlining, I am almost looking forward to testing it out in Winter 😉
This is so amazing! Can I have your sewing skills transplanted into my brain, pretty please? It is a smashing colour and it’s just gorgeous all around really! Well done! 😀
Hehe, thanks Jo 🙂 Not sure how we can do the transplant but I’m happy to help if you want to try this coat or similar, it’s a good challenge but I think you could definitely do it!
Thanks Mel! You are lovely. My dream is to make a jacket one day 🙂 Like a classy lil one button blazer.. Yum.