
WARNING: This post is loooong. I was going to break it up into two but I decided it’s easier to keep it all together, then those of you looking for coverstitch information can find it all in one place.
You can use these links to navigate:
.
I was a very lucky girl this Christmas, “Santa” didn’t know what to get me so I asked for something I’ve been thinking about for a while: a coverstitch machine.
Santa knows what a coverstitch machine is, we’ve discussed them before. He said, “If you make me a hoodie with cool stitching then I’ll put one under the tree…”
Deal!
So I went into full investigation mode. It’s hard to find a lot of information about coverstitch machines, even more difficult to find one to test drive here in NZ. It seems that, like overlocker machines in the home back in my Mum’s day, cover stitch machines are only just beginning to gain traction with the domestic market.
(I will refer to my overlocker a few times in this post, it being the closest thing I have experienced to a coverstitch. Overlockers and sergers are the same thing. In NZ we call them overlockers so that is the term I will continue to use.)
This is a luxury purchase. Between my Elna 2130 and Bernina 1150MDA I have two very good machines that allow me to create anything I want. I love sewing, I sew a lot and I often sew with knits/stretchy fabrics. The “want” was strong. 😉
So I am going to share my experience of choosing a coverstitch machine and what I think of the machine I purchased. This is from my point of view and based on my personal sewing experience, I am not an expert. I hope this post will help any of you who are also considering one.
Disclaimer: By reading this post you release the curious kiwi from any responsibility should the following cause you to run out and buy a new sewing machine!
.
If you are familiar with an overlocker, a coverstitch machine is similar except that they have no knives and only one looper with 1 or 2 needles. On higher end machines you may also have a 3rd needle.
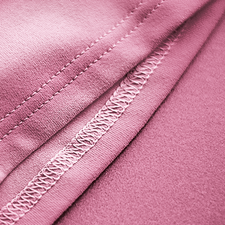
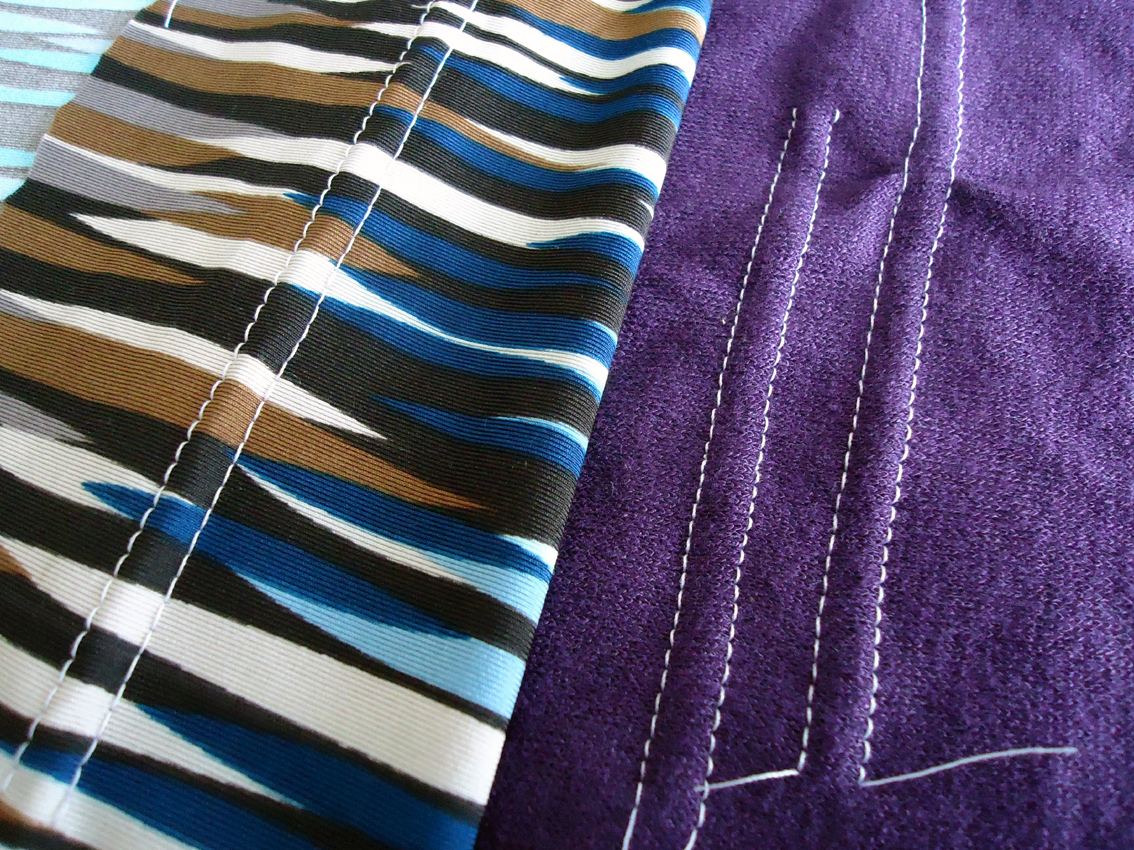
I am still learning everything that my coverstitch machine can do but the most simple way to introduce you to coverstitch is for you to go grab a rtw t-shirt. See the double row of stitching on the outside of the hem and at the sleeves? It looks a bit like twin needle stitching but inside it looks like an overlocker stitch and encases the raw edge. This is a 2-needle coverstitch.
A 3-needle machine gives you two different widths of coverstitching – using the centre needle plus the left or right needle for a narrow width of 3mm OR using the two outside needles for the wider width of 6mm. And of course you can use all three needles at once.
You can also use the coverstitch to apply the “overlock” looking stitch as a decorative finish to the outside by stitching with your fabric “upside down”. You often see this type of decorative stitch on sports wear, sometimes in a contrasting thread colour.
Stitching with only 1 needle threaded creates a chainstitch. At first I wasn’t really sure what chainstitch was for, apart from embellishment (you can use a thicker thread in the looper), but I have read that it is great for basting because it unravels easily when the correct thread is pulled. Since developing my spot-the-coverstitching-vision I’ve noticed that on some of NH’s t-shirts there is 1 or 2 lines of chainstitching at the shoulder so perhaps it is also good for reinforcing those areas.
Some high-end overlockers can also convert to coverstitich. When I was investigating my overlocker purchase I looked at a few machines that could also coverstitich but chose to buy a dedicated overlocker. The price jump to a machine that could do both was out of my budget at the time but I was also advised that converting them can be difficult and that machines that do both can be a compromise of both designs. I was already 100% overwhelmed by the overlocker options so I decided at that time I would buy a dedicated coverstitch machine when I was ready.
Having said that however, I also know people who own these machines, use them as both overlockers and coverstitchers and love them.
Here are my tips for sewing machine shopping (for any type of machine):
- Each brand is different – consider the brand you are familiar with but don’t forget to look at others
- This is an important purchase so it’s important to “test drive” your options
- Set a budget and decide what you want your machine to do
- Think about how your sewing will evolve, try to buy a machine that you can “grow into”, consider any bonus features you can use in the future
- At the shop try threading and converting the machine yourself
- Take samples of fabrics that you sew with and try them out
- Try all the features
- Ask lots of questions
- If the sales assistant isn’t helpful, go elsewhere
- Make it fun!
My ideal coverstitch machine was less than NZD$1000, 3-needles/4-thread, had a free arm, and was not super chunky.
.
Bernina 009DCC/L220
I have a Bernina 1150MDA overlocker that I LOVE so it seemed logical to investigate Bernina first.

On their website they have a picture of the 009DCC, it is a 2-needle/3-thread coverstitch machine with no free arm. It has front dial-style tension adjustment knobs that look a little old fashioned in my opinion but I was prepared to give it a test drive.
I looked at this machine about 6 months ago and emailed my local Bernina dealer to ask about costs and if they had one in store for a test drive. They are near my work so it meant I could pop down during my lunch break for fun sewing play time. They replied that Bernina were releasing a new model soon and would let me know when it arrived. I rung them about 2 months ago after hearing nothing and got the same response and they didn’t seem inclined to help me further.
When I started looking more seriously just before Christmas I rung a different dealer outside of the CBD. She confirmed that Bernina are releasing a new machine but also offered to ring them to ask when it would be available and how much it would cost. The 009DCC will be replaced with the L220 in March 2014 and will cost NZD$1399 – This was way outside my budget and impatient kiwi didn’t want to wait that long.
Here is a sneak peak I found of the L220 and a YouTube video. It will be a 3-needle/4-thread machine but I cannot see a free arm.
Brother 2340CV
Next I grudging looked at Brother, I say “grudgingly” because Brother makes me think of printers and $199 sewing machines from Harvey Norman. However, since their sewing machines are fairly cheap…perhaps their coverstitch would be too?
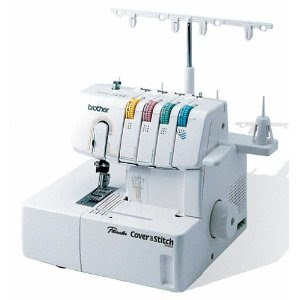
I did not get far enough along in my investigation to learn how much this machine costs – perhaps around NZD$600? – I pretty quickly discounted it from my list.
While it is a 3-needle/4-thread machine, it looks hideously clunky, has no free arm and I read some not very encouraging reviews about it online: There are difficulties in releasing the thread tension after you finish stitching and the foot controller is laggy when you start stitching.
Elna 444
This will sound silly (and vain) but when I was overlocker shopping I investigated Elna first. My sewing machine is an Elna 2130 (now discontinued) and it’s a great machine but when it came to the Elna overlockers I really didn’t like how they were painted up all “Fisher Price”. I think the newer machines are different now but at that time the thread path colours were overdone and it made me feel a bit babied. I kind of like my machines to look more grown up 😉
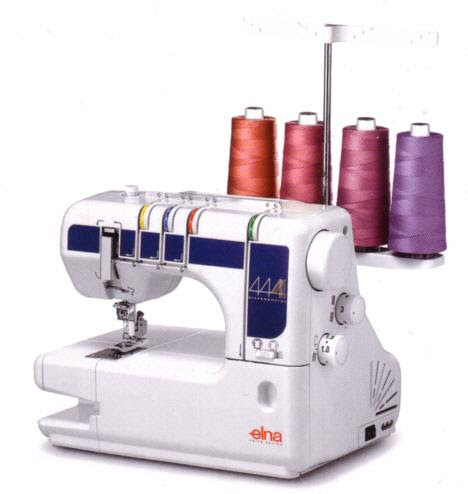
Their coverstitch isn’t so bad and I was willing to give one a try.
Unfortunately Elna have given the majority of their dealership rights to Spotlight, ugh!
I could write a ten thousand word essay on how bad their customer service is so don’t get me started. I was immediately not enthused about purchasing through any of their stores considering I might need to go back there for servicing and purchasing accessories. I rang them anyway and left a message but have not heard back from anyone to this day…there are a few other dealers in Wellington who sell Elna machines and I soon found out that the 444 isn’t available in New Zealand.
I also learnt that Janome make the Elna coverstitch and from what I read online the Janome would possibly be slightly less expensive.
So of course Janome were next:
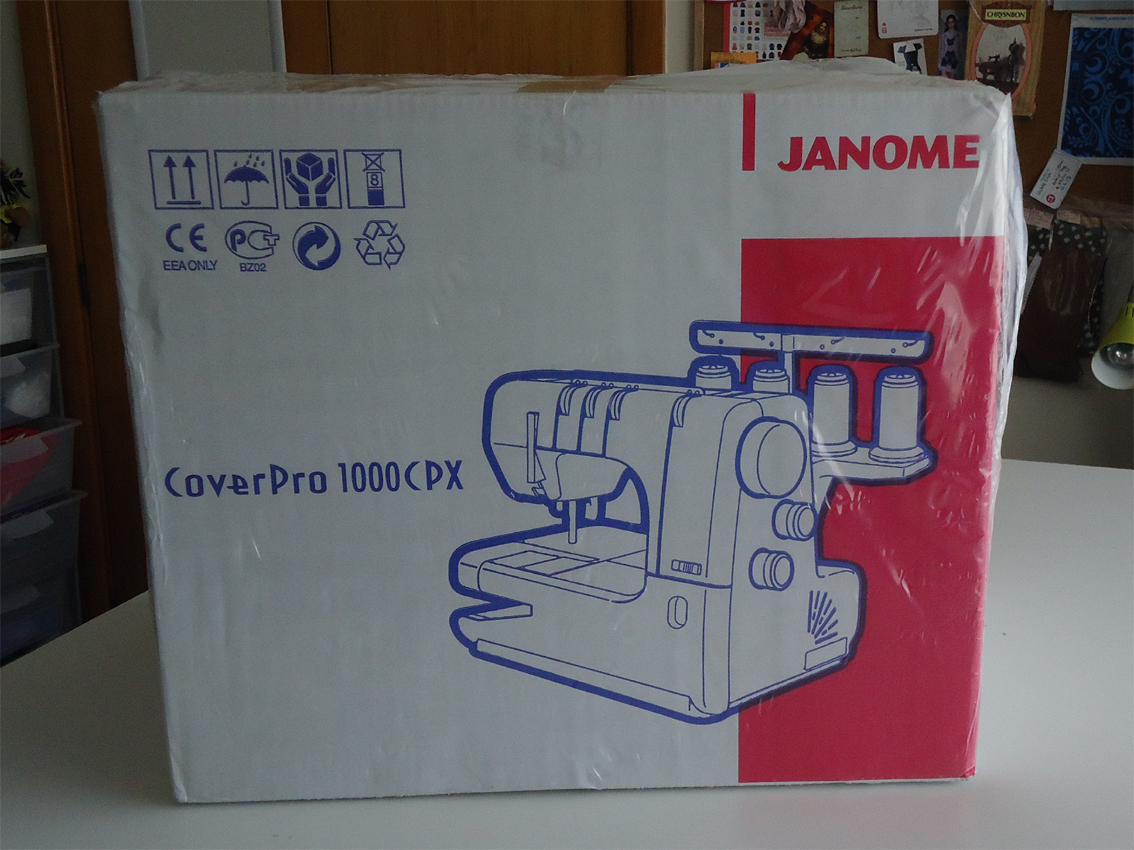
Janome CoverPro 1000CPX – NZD$899 (on special)
I rung Wellington Sewing Services in Kilbirnie where the gentleman who answered the phone replied to all my questions including confirming the price and quickly suggested I come in for a test drive.
Finally, some real service and a machine worthy of my time.
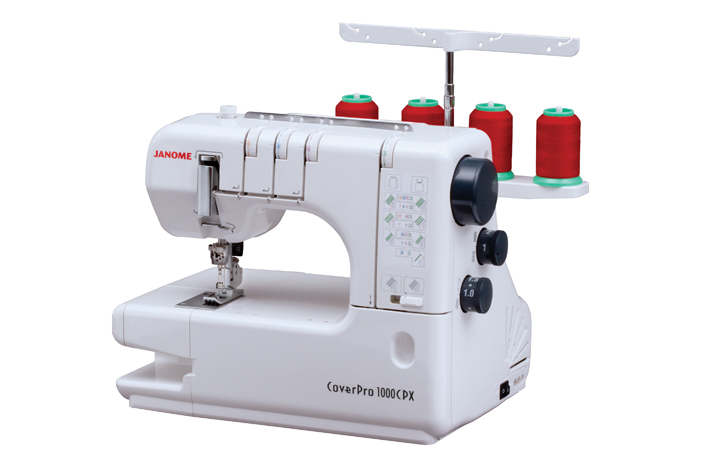
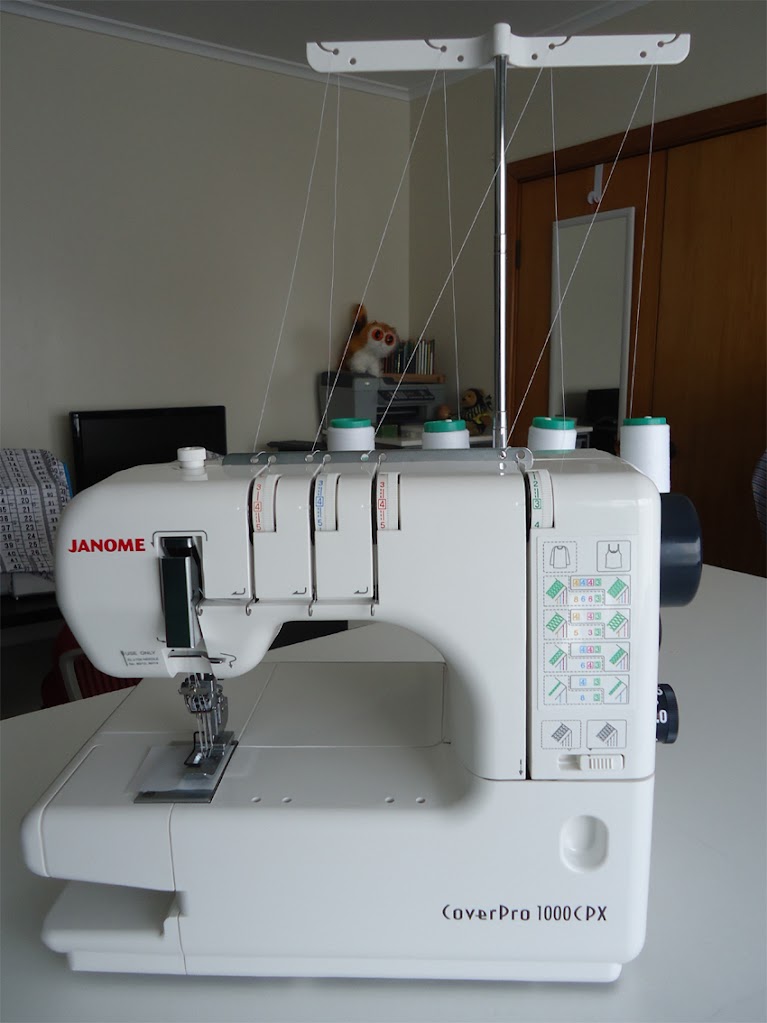
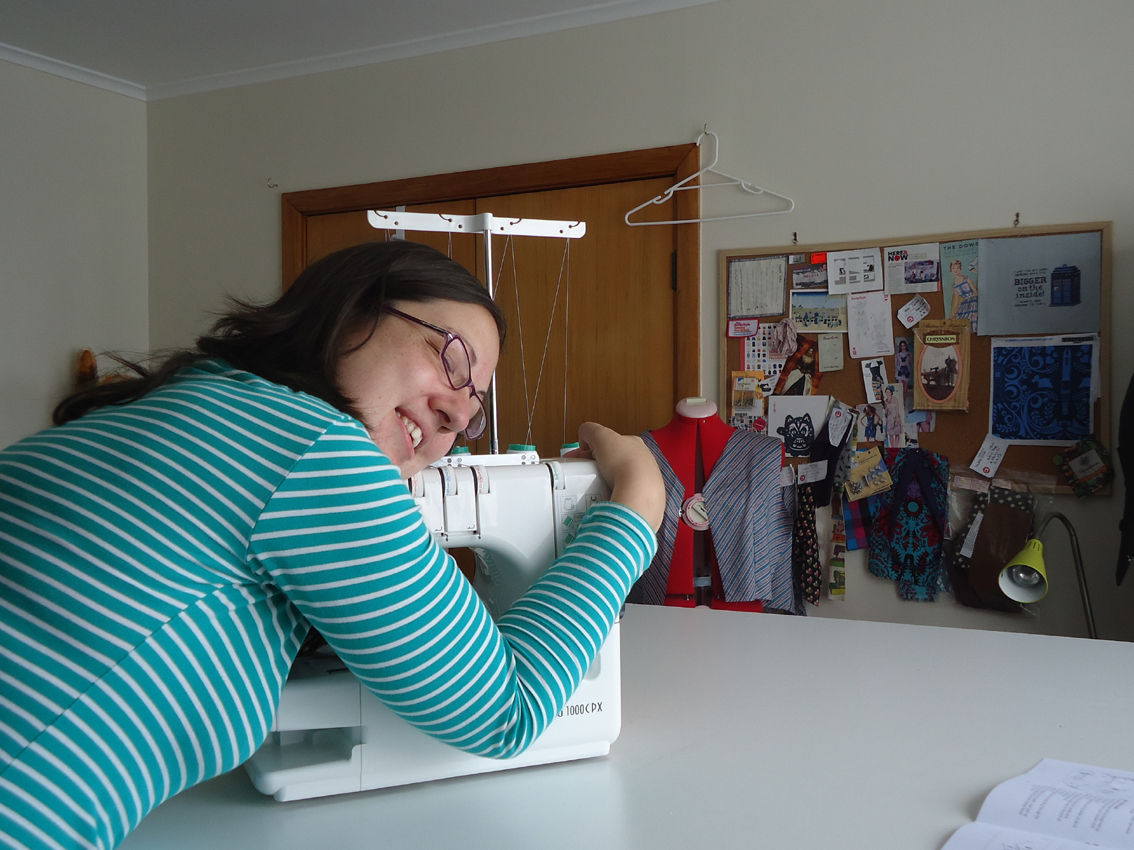
While waiting for the weekend to roll around I read some great things online and watched some YouTube videos. This 3-needle/4-thread machine has the more upright look of a traditional sewing machine with a long arm promising lots of sewing space. It also has a removable piece on the sewing bed that reveals the free arm.
On Saturday NH drove me to the shop. The gentleman who I spoke with on the phone pulled out the machine and showed me how it worked. Then he un-threaded and re-threaded it to show me how easy it was and let me have a go using the samples of stretch fabric that I bought along with me from home.
It was AMAZING! My two fabrics were very different, one a slinky lycra and the other a cotton jersey, but it stitched both pieces beautifully without changing any settings.
The machine in the store had white thread in the two outer needles and a variegated thread through the looper: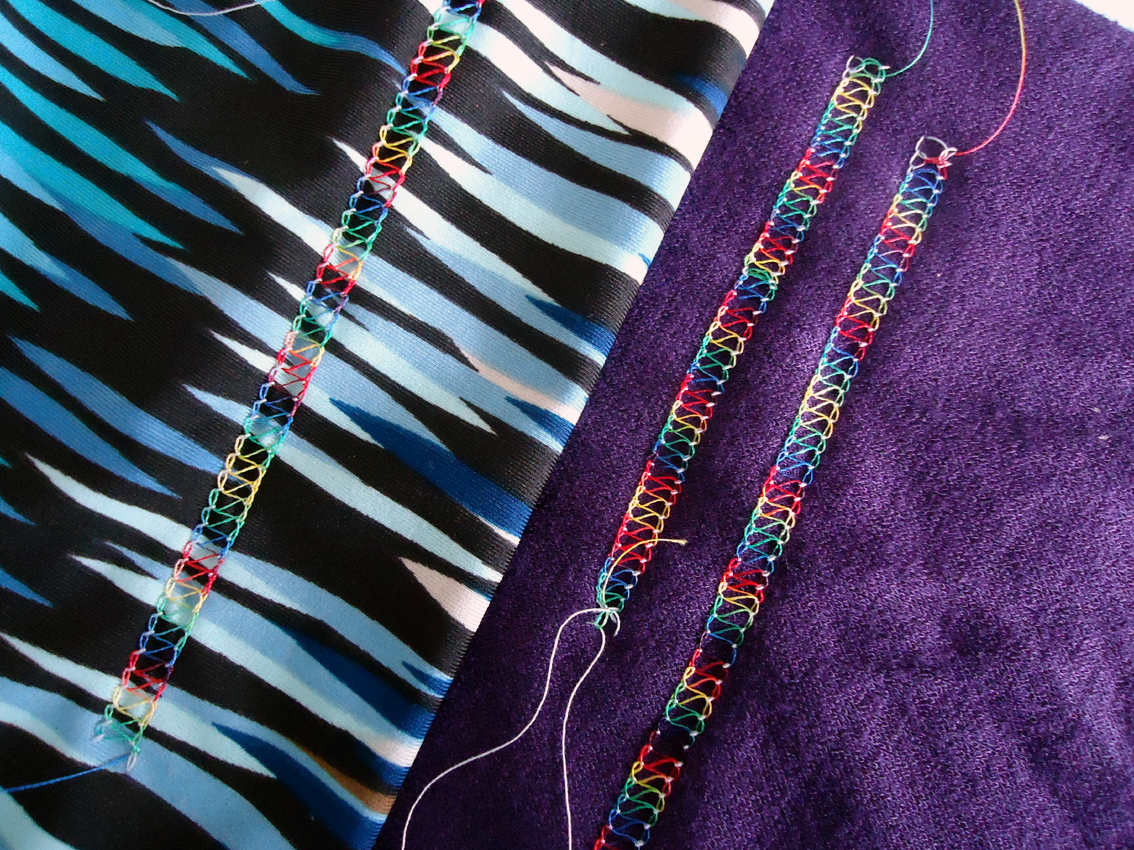
Trippy!
Next I was shown how to correct skipped stitches by adjusting the differential feed.
TOP TIP! This is the most common complaint I read online about ALL coverstitch brands and not many people know this trick. I also leant how to stop “tunnelling” in merino by using a wash away stabiliser.
I was so impressed not just with the machine but with the service. It was my first visit to Wellington Sewing Services and I will definitely be back. It’s an amazing store with lots of stock and the gentleman who helped me really knows his stuff. He picked up quickly that I was an experienced sewist – there is nothing worse than being overly babied – and I enjoyed being allowed to use the machine with little interference so I could make up my own mind.
While I played around he talked a bit more about the machines features and motor. He has been servicing and repairing machines for quite some time and has a very high opinion of Janome in general.
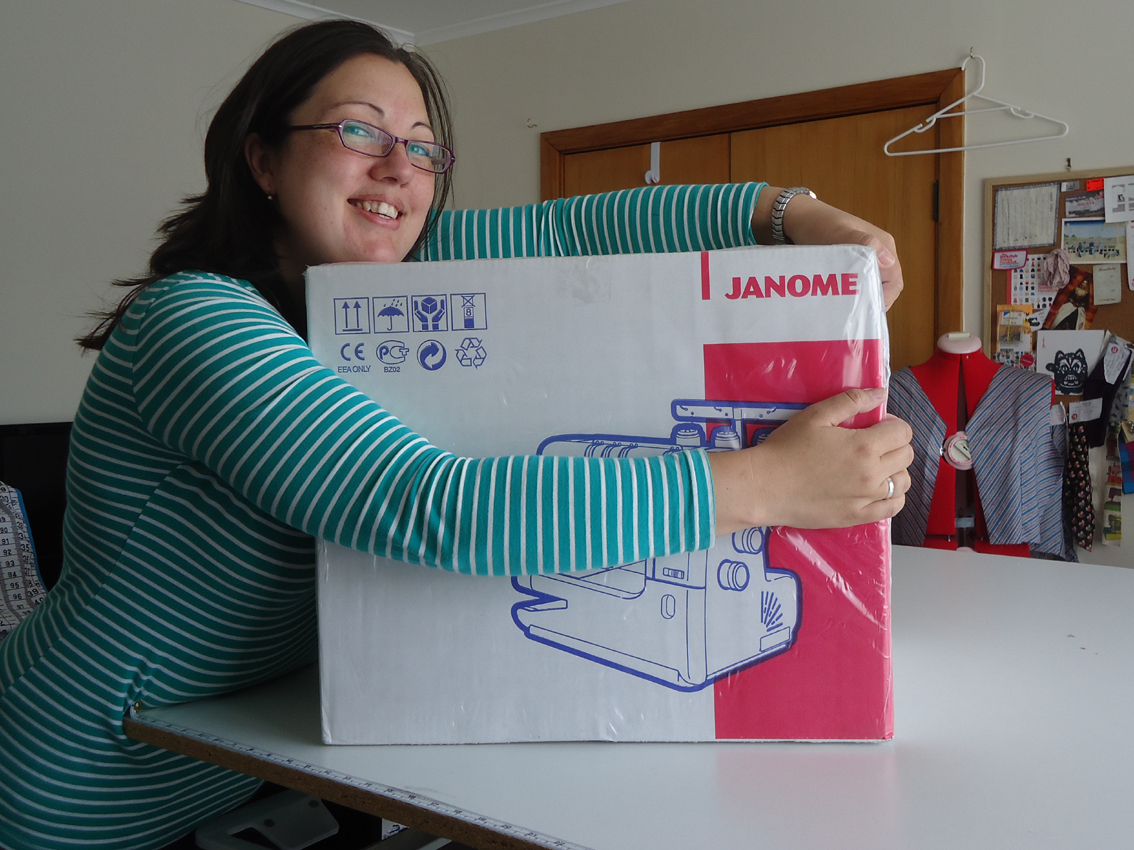
I probably should have test driven another machine as comparison but after 30 minutes it was too late, I was SOLD! 🙂 I took the machine home that day along with a free pair of fabric scissors and a long strip of the wash away stabiliser.
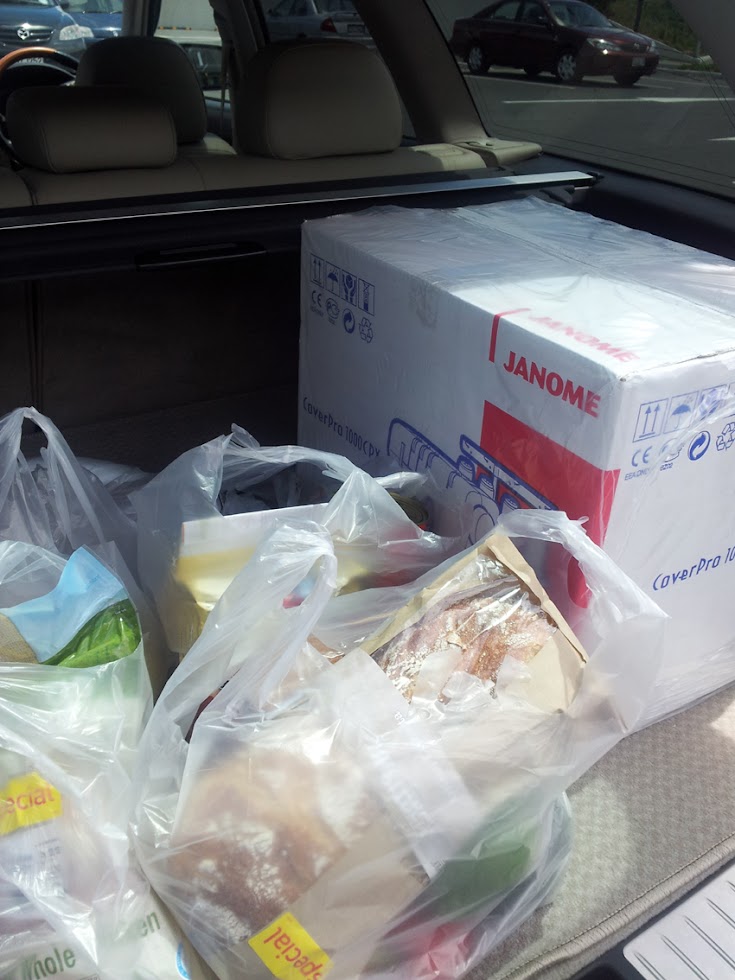
A boot full of Christmas shopping: Doing it right
Other machines I could have looked at, but discounted due to cost was the Babylock at NZD$1999 and the Pfaff Coverlock 3 or 4 at NZD$1699 and NZD$2599 respectively.
.
 The machine came in a really good quality box, wrapped in plastic. The lovely man at Wellington Sewing Services filled out my warranty card and dropped in a free pair of fabric scissors so technically my box had already been opened but he resealed it with packing tape.
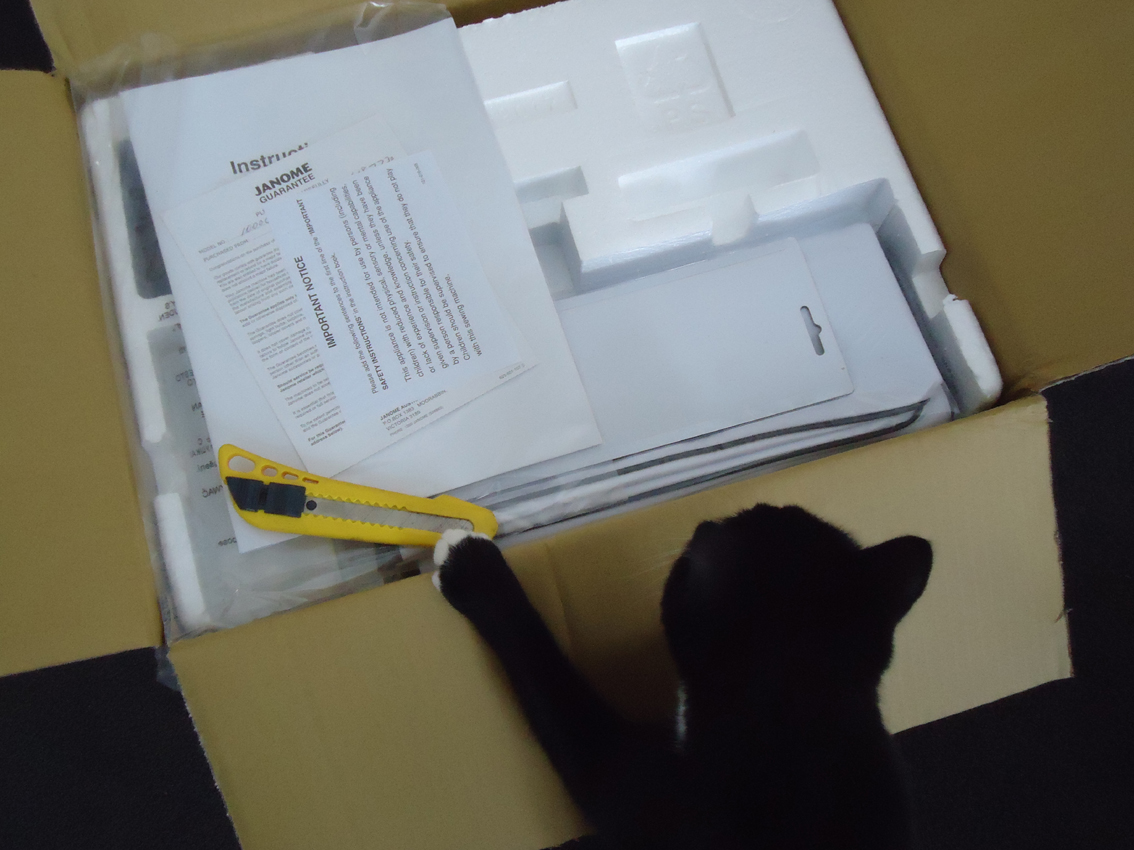
Harri was excited about the prospect of a new box to claim as her own – a chunky bit of polystyrene on top kept her out of it…for now…
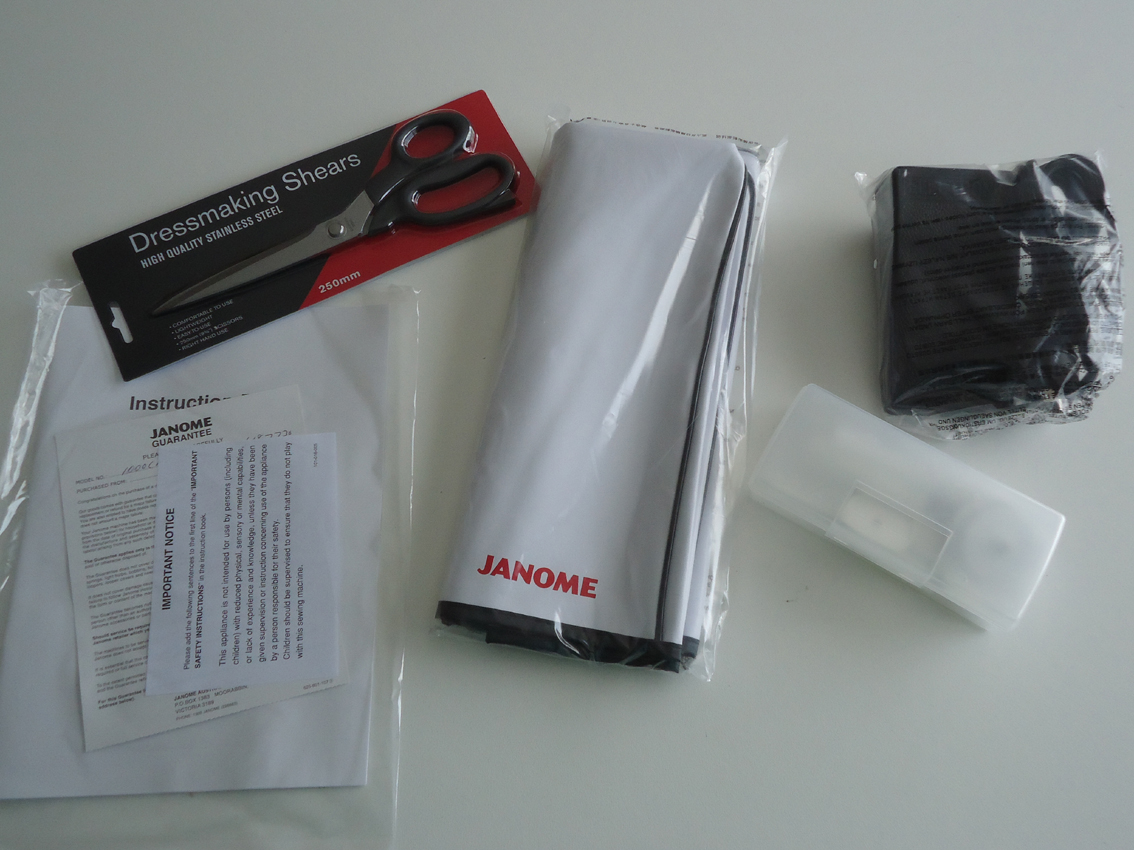
On the top layer were my free scissors (not as nice to use as my Mundials, but always good to have a spare set floating around!), plastic bag with manual and warranty card, vinyl machine cover, foot controller and plastic box filled with the standard accessories.
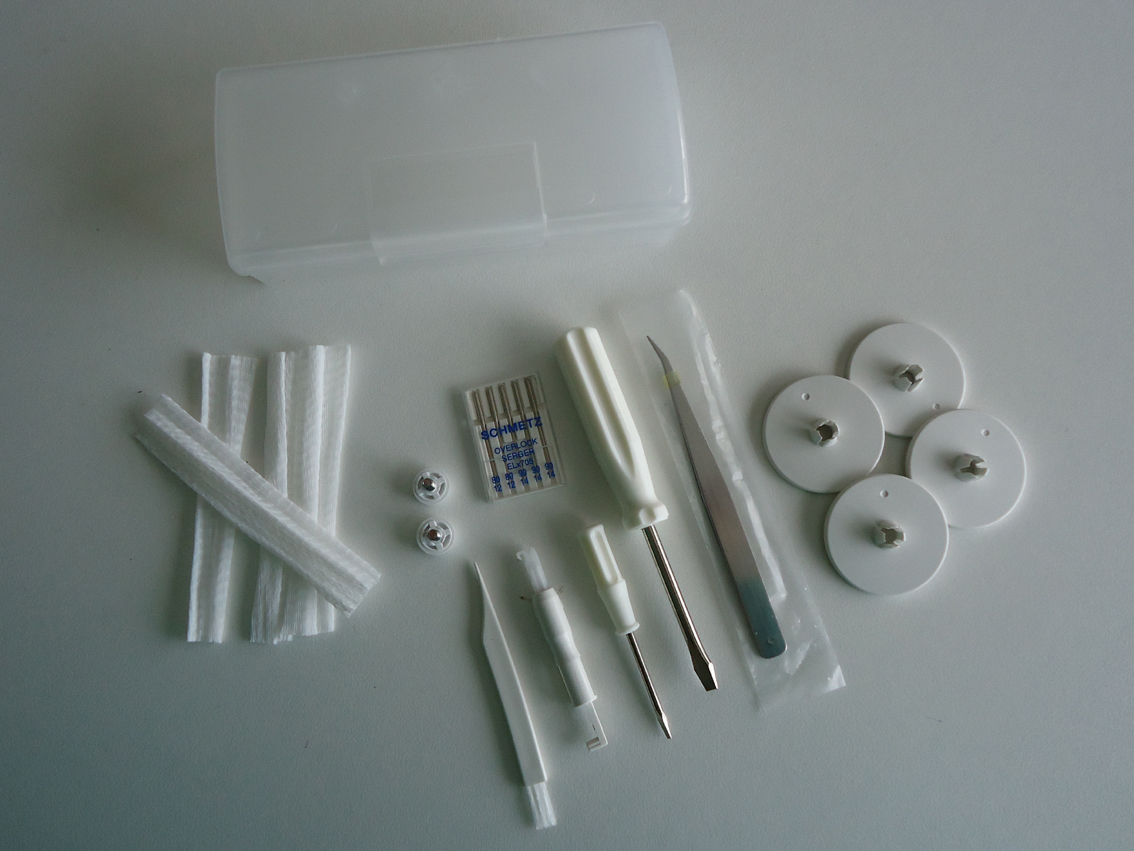
Inside the plastic box:
- 4 thread spool nets
- 2 accessory screws
- Schmetz needles (it uses the EL X 705 needle system)
- 4 thread spool caps
- Tweezers
- 2 screwdrivers
- Needle threader
- Lint brush
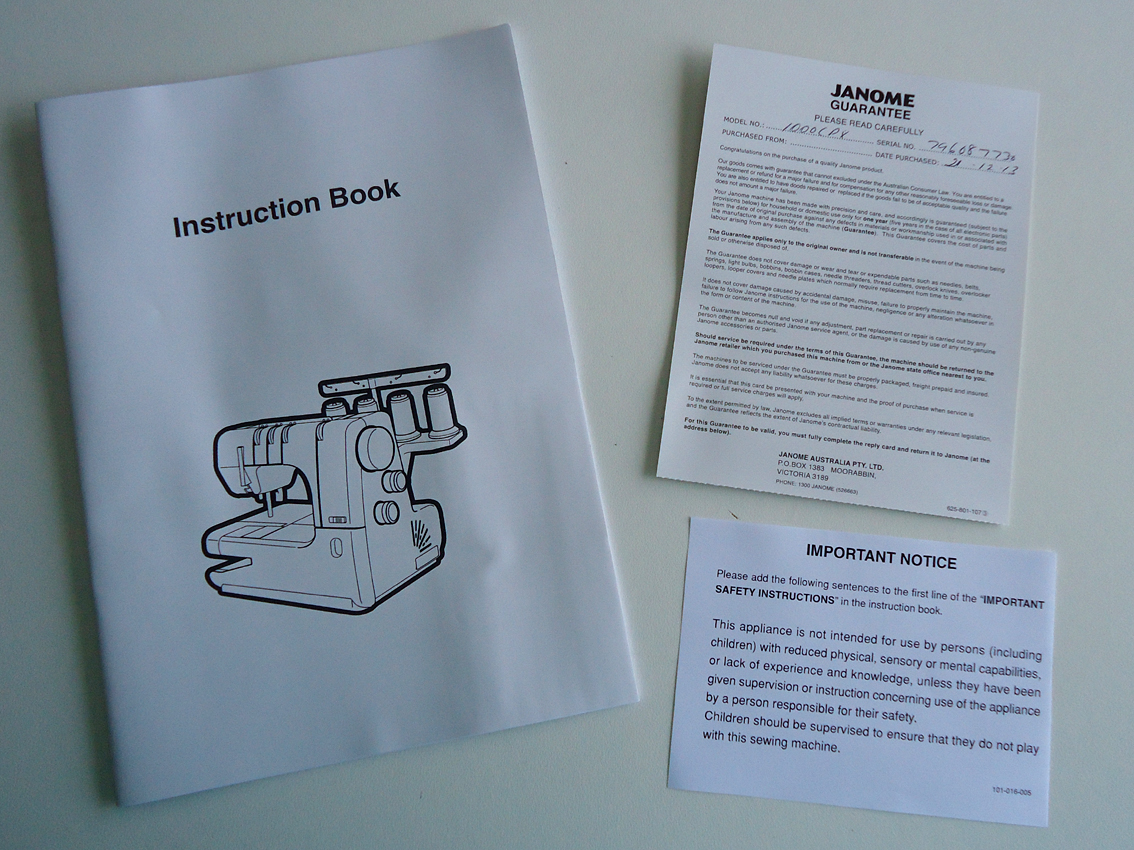
Manual, warranty card and…umm, an “Important Notice” about not letting children play with the machine unsupervised.
 The only bad thing I read online about this machine was complaints that the instruction book was lacking detail – I’m not sure if perhaps I have a newer book with more information but it was about what I expected. Similar in content to the instruction books that came with both my other machines.
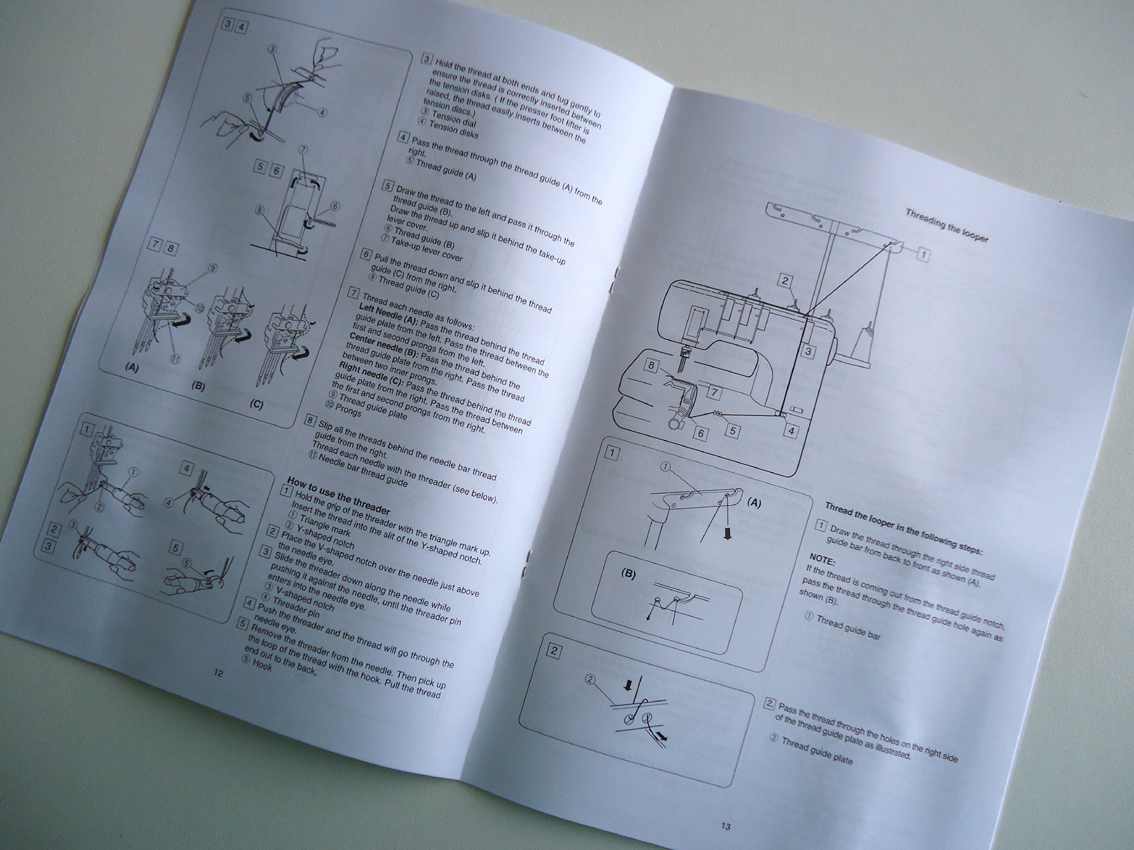
The instructions include a large diagram of the machine, naming all the parts, information on how to set it up and what each dial does. Clear threading diagrams are followed by instructions on setting up each stitch type including correct tensioning. The final section includes machine care and a troubleshooting table.
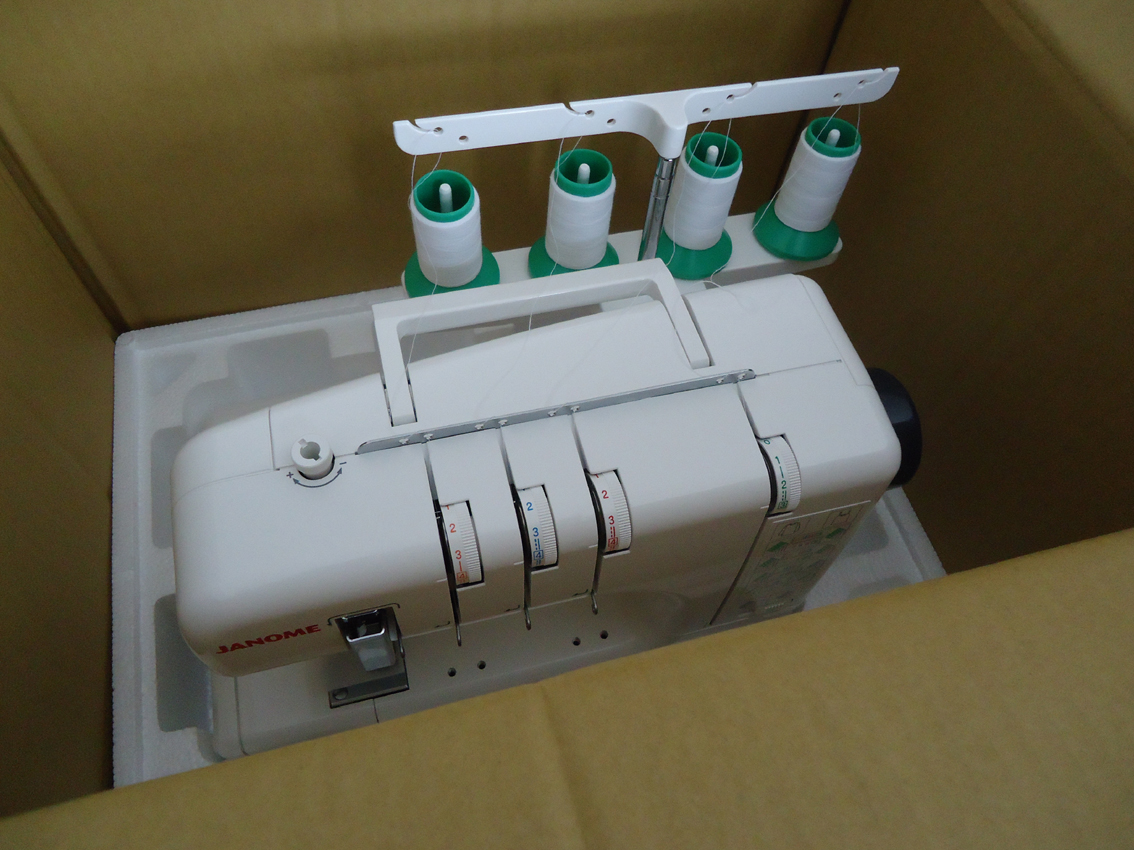
Back to the box – under the foam I was surprised to find the machine pre-threaded with all three needles in white. Nice!
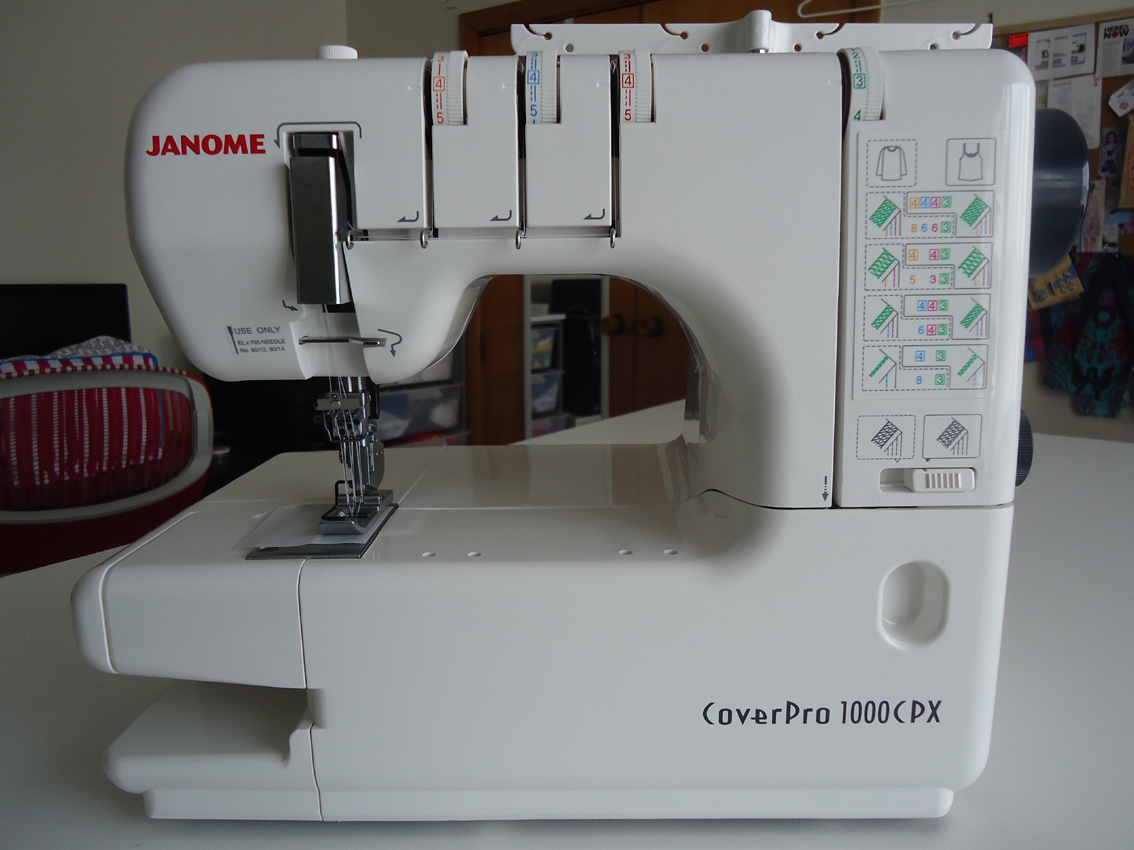
From the front it looks almost like a normal sewing machine.

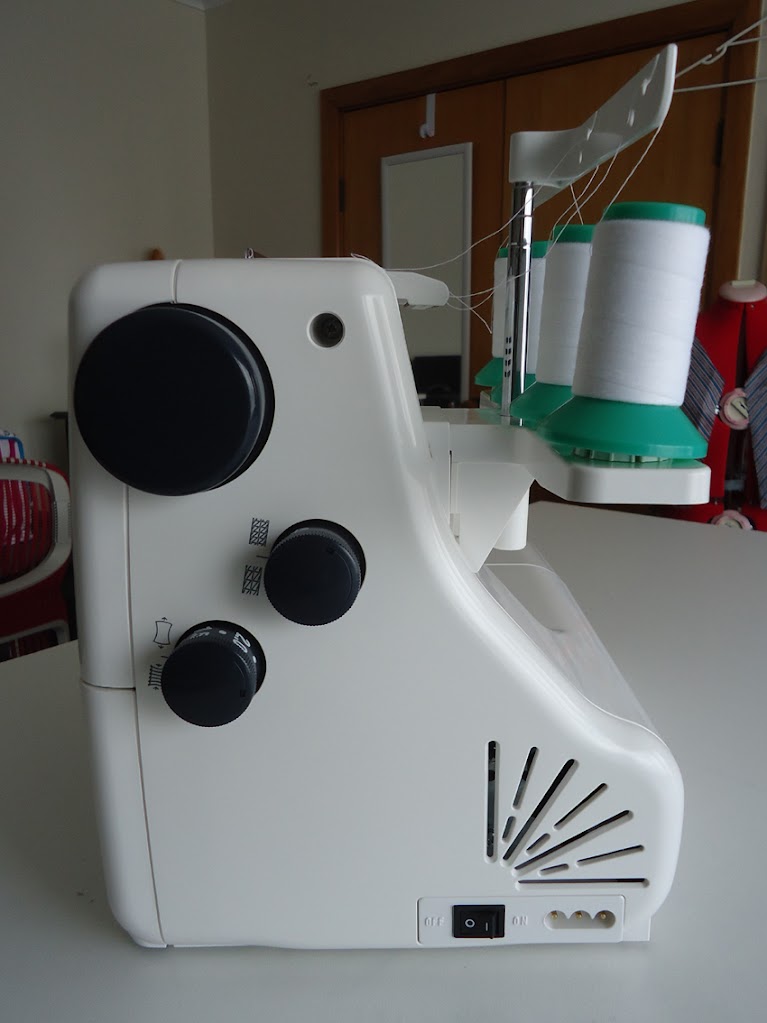
From the side you can see the extra depth. Hand wheel, stitch length dial and differential feed located similar to my Bernina.
More vanity talk: Online I saw a lot of images of this machines with lilac coloured handwheel and knobs – I’m glad mine is dark grey 😉

Ohh free thread!
On the front right is a quick reference guide of tensions for each stitch type.
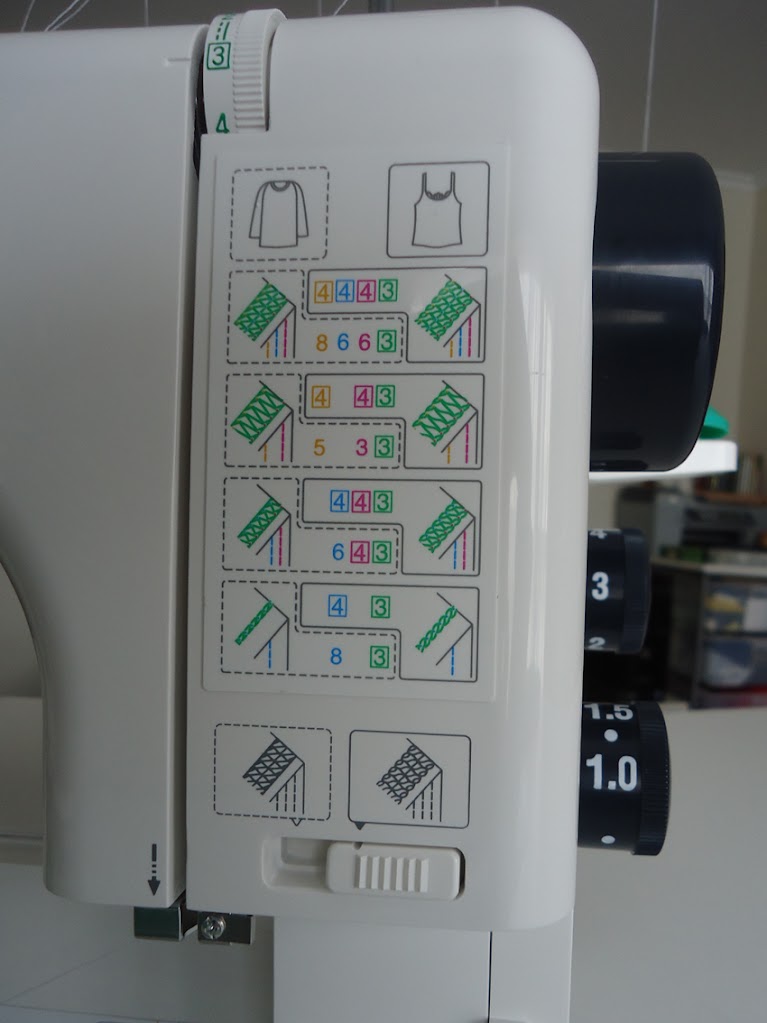
On the left, recommended settings for heavyweight fabrics. On the right, for light to medium weight. As with any tension settings these are just starting suggestions and the manual explains how to tune these for a balanced stitch depending on your fabric.
The slider below this is an additional adjustment to the looper thread tension, used when sewing heavyweight fabrics.
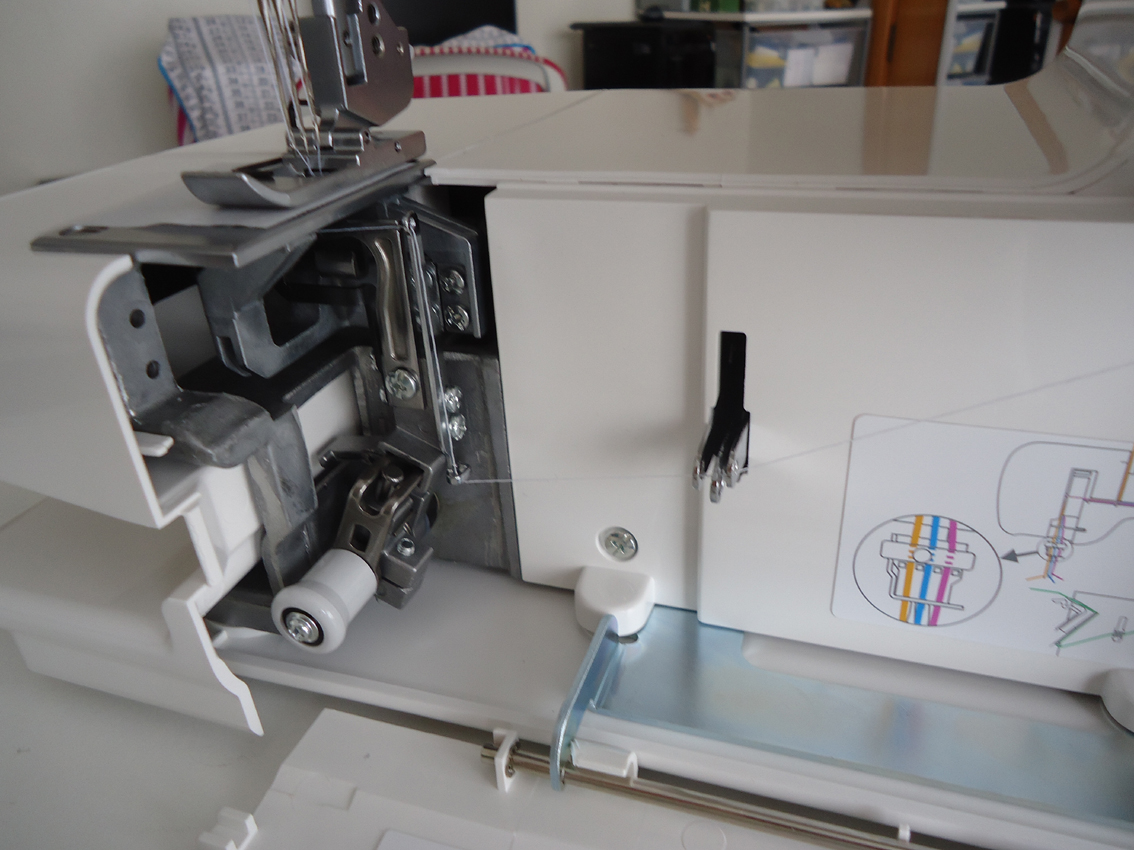
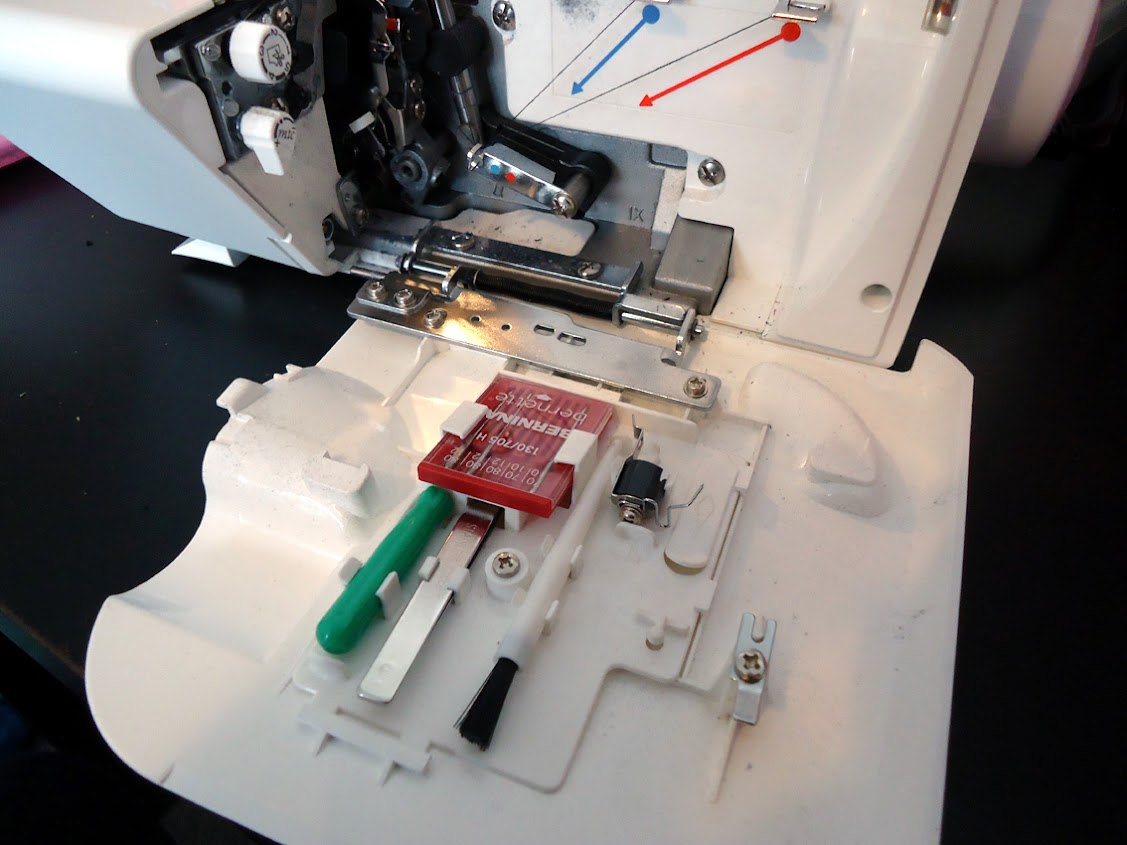
Inside the front cover you can see the thread passing through the looper take up levers (the three fingers at centre) and on to the looper, which is tucked under the feed dogs. The white knob near the base drops the looper out (to the right) so you can easily thread it. You click it back in when you are finished and bring the thread to the top.

A nice clear threading diagram and…
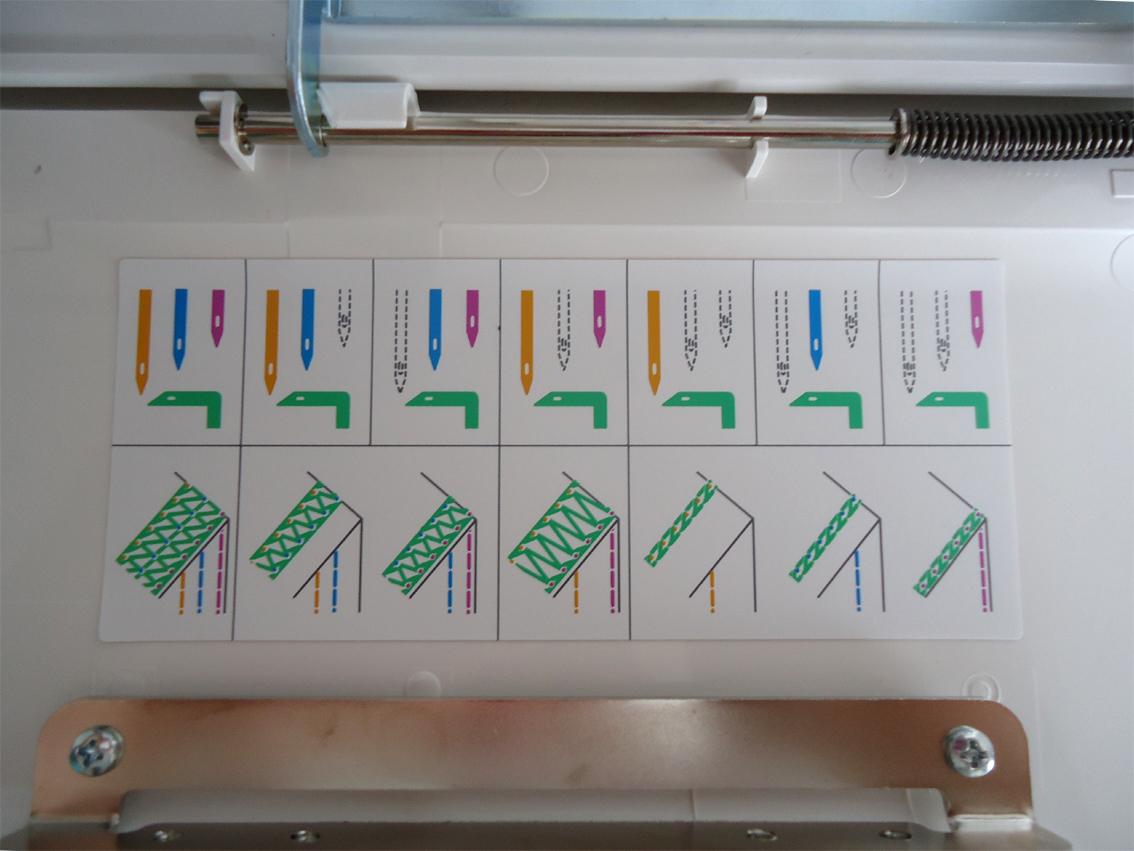
…quick reference for threading each stitch type.
It’s really easy to thread and tension plus the long arm gives you a lot of space to manoeuvre fabric around. It’s also fast (not quite as fast as the Bernina, but I’m ok with that!) and it’s very quiet.
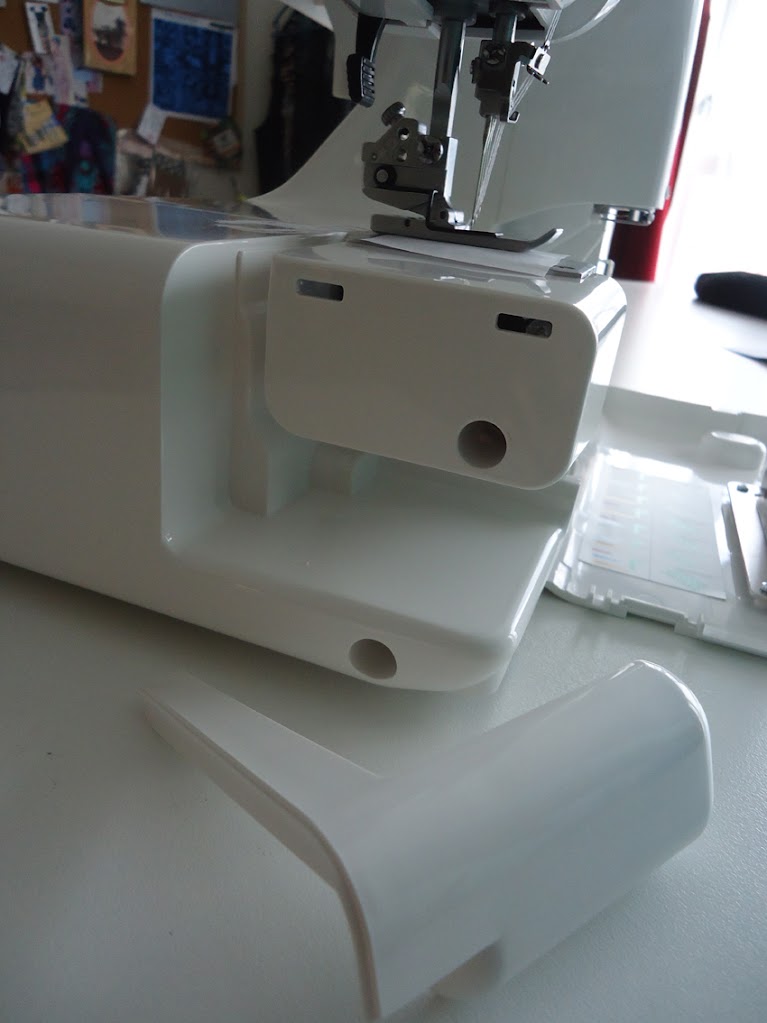
The extensions table piece removes easily to reveal the free arm.
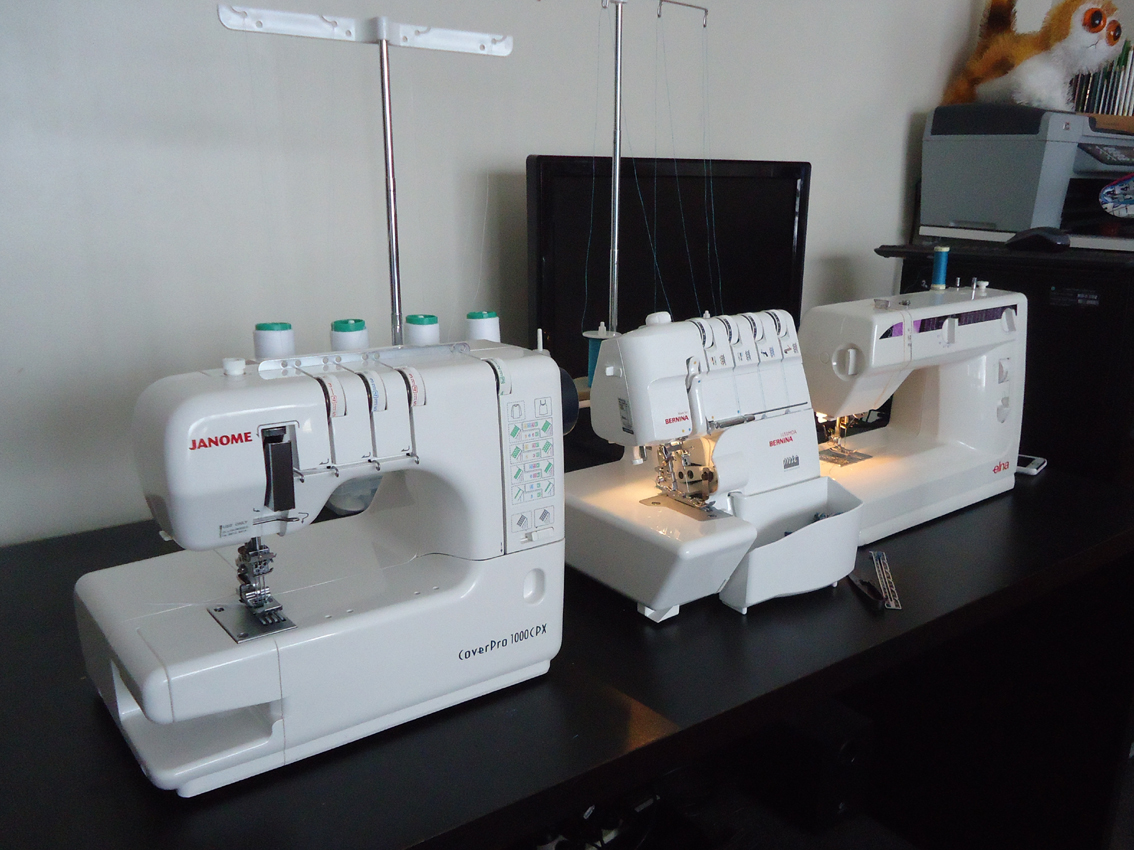
All lined up it appears as if I am trying to collect every brand of sewing machine, and I need a bigger table, hehe! Oh and I just noticed that all the brand names are printed in red.
In reality they don’t sit on my table like this. I’m usually only using two machines at a time so the spare machine sits near the back. Ideally I’d like to position my table perpendicular to the wall so that I can put the overlocker and coverstitch back-to-back.
The only problem I have right now is that the foot controller is identical to the one for my Bernina (but the machine plugs are different so I still have to have both under the table) it’s hard to tell which to step on for each machine. First world sewing problems, I know, solved with a bit of fluorescent pink tape wrapped about the Janome’s cord 🙂
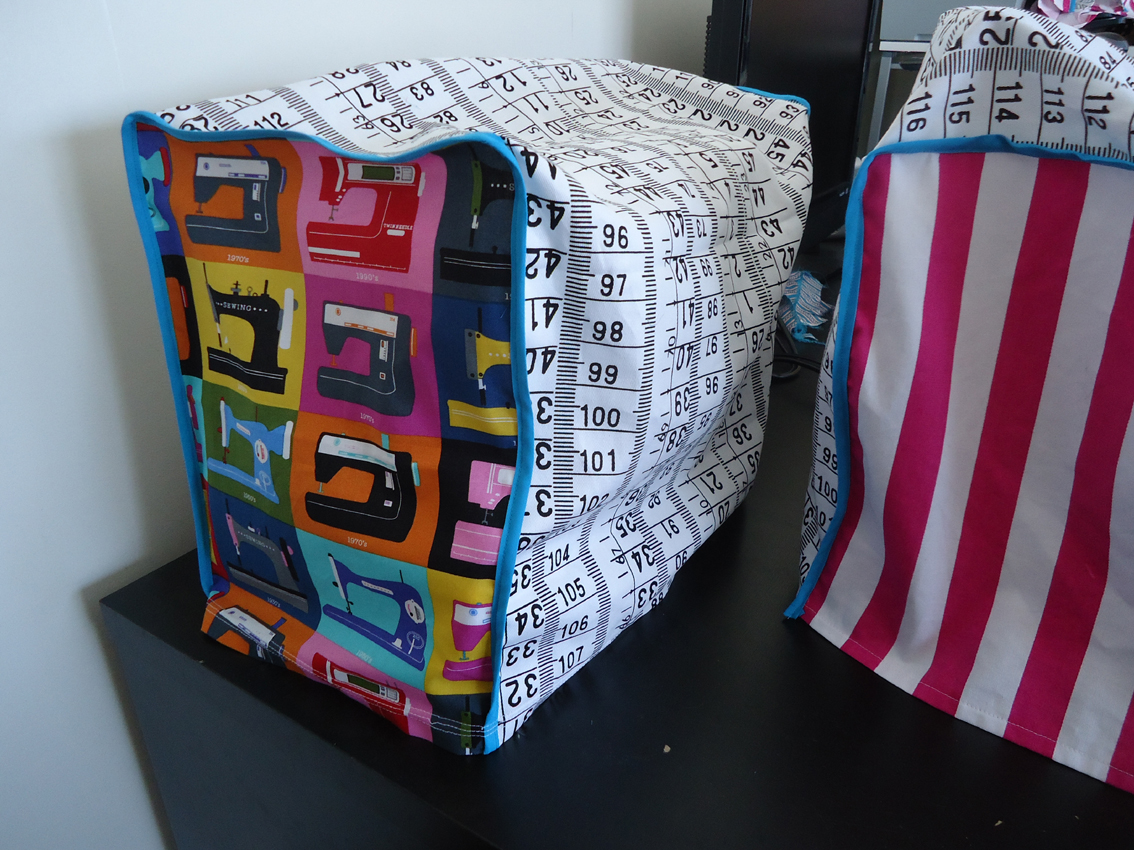
My first official project with my new machine was a fabric cover – look at the naff vinyl one it came with, yuck!
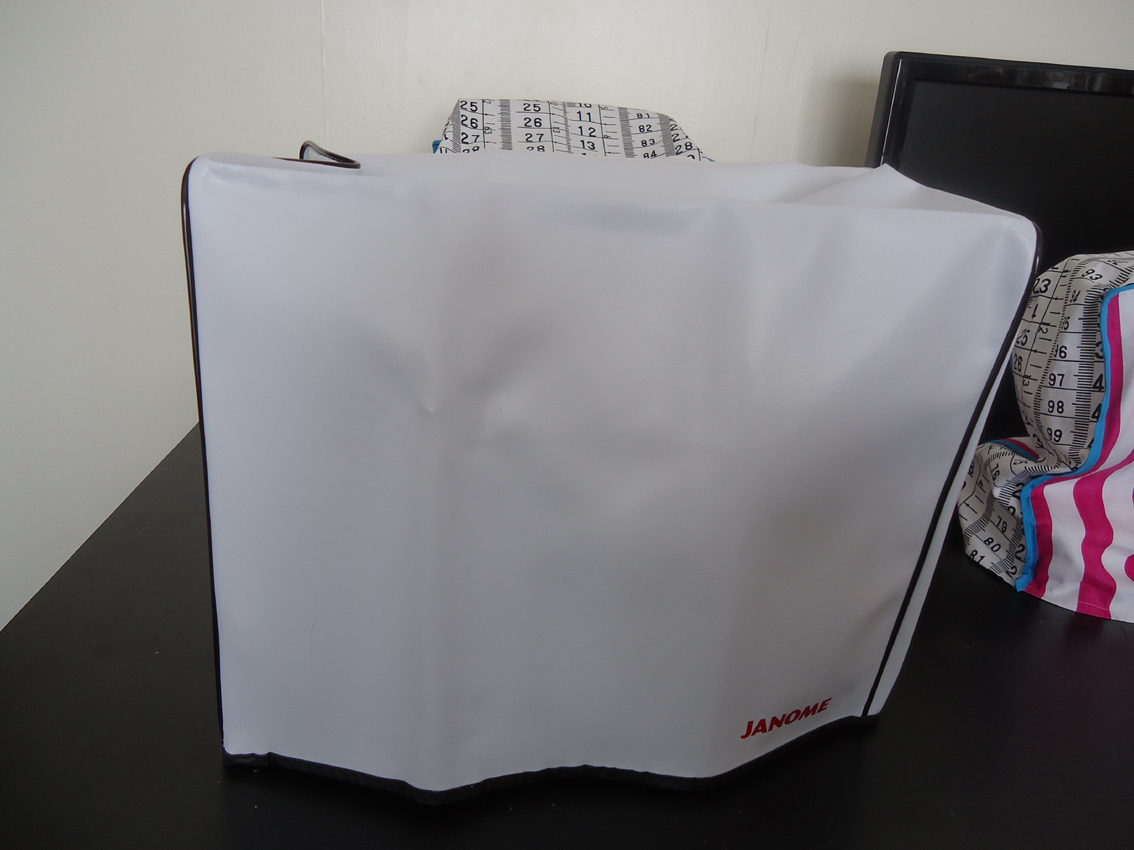
I never used to cover my machines but a certain furry helper who likes to eat thread means they need to be hidden when I am not around.
I ran out of the circus stripe (as NH refers to it) so I used some of my precious retro sewing machines. I hemmed the bottom with the coverstitch, pretty!
It’s not all super amazeballs however, and to prove I’m not begin paid by Janome to gush about their machine 😉 here’s a quick outline of things I wish it had:
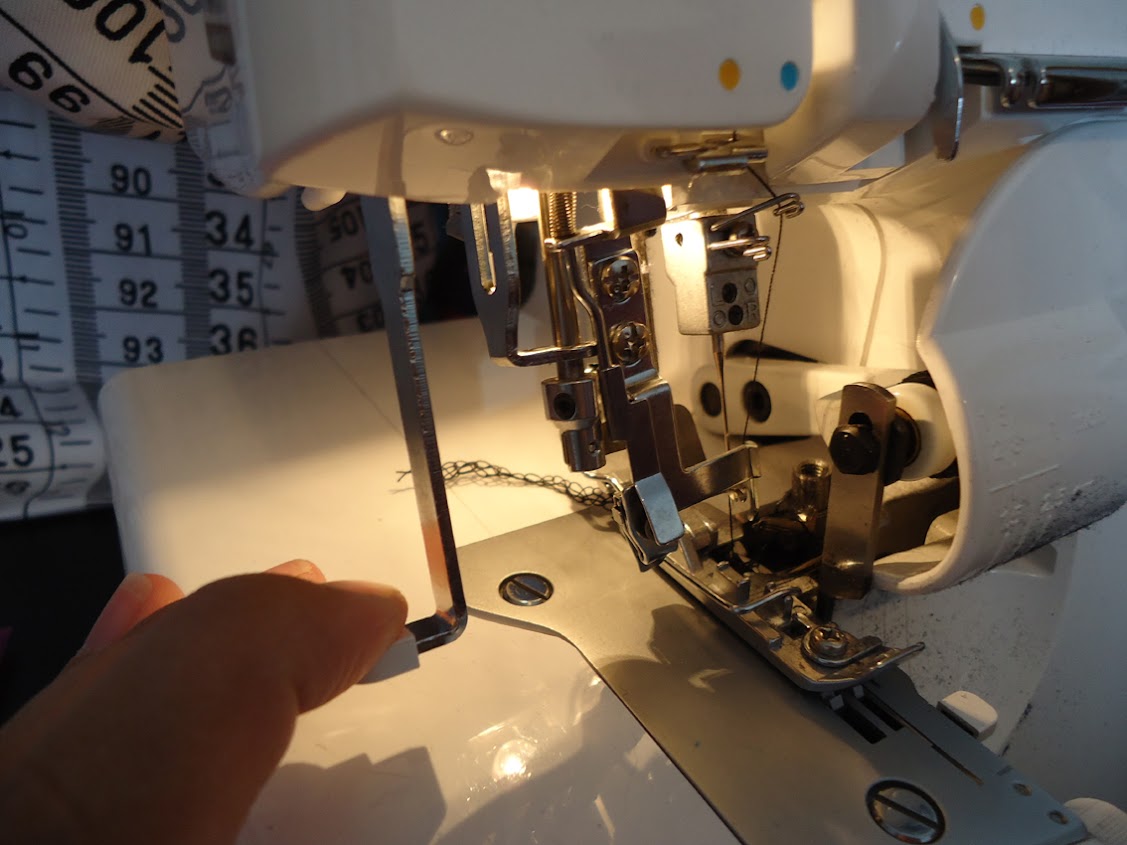
There is no on-board tools storage. When I rethread my Bernina, I do it from scratch, every time. Because reasons. Anyway, I flip open the cover, slip out my tweezers (and screw driver if I’m changing a needle) and get on with it. I also need the tweezers to thread the looper on the Janome and it would be nice if it had a slot inside the front cover to take at least the tweezers, but also perhaps the needles, brush and small screw driver. Instead they live in that little plastic box. The designer in me wishes they had made better use of the spare room inside the cover.
On board storage – Bernina 1150MDA
My Bernina also has a needle threader. While the Janome machine has more room to make threading the needles a little easier the little stick thing they give you for threading is hard to use. I’ll admit I haven’t really tried very hard to get the hang of it yet, I’ve been doing it “manually” so I’ll persevere and come back to you on that. Perhaps there isn’t room for something like the threading mechanism on the Bernina but it would have been nice to see it included if possible.
Needle threader – Bernina 1150MDA
Lastly, I wish it came with a few of the accessories – I did investigate them before buying so I knew they were fairly expensive. You can buy “generic” attachments, but I have read mixed reviews about them.
I will be buying the centre guide foot (NZD$79.00) and hemmer (NZD$39.00) because I already feel I need them. Later on I may get a binder but to use that you also need to buy the special attachment plate. This comes to a grand total, for binder and plate, of NZD$269.00! Ugh Janome, you could have at least included the plate, why did you bother to give me those attachment screws?!
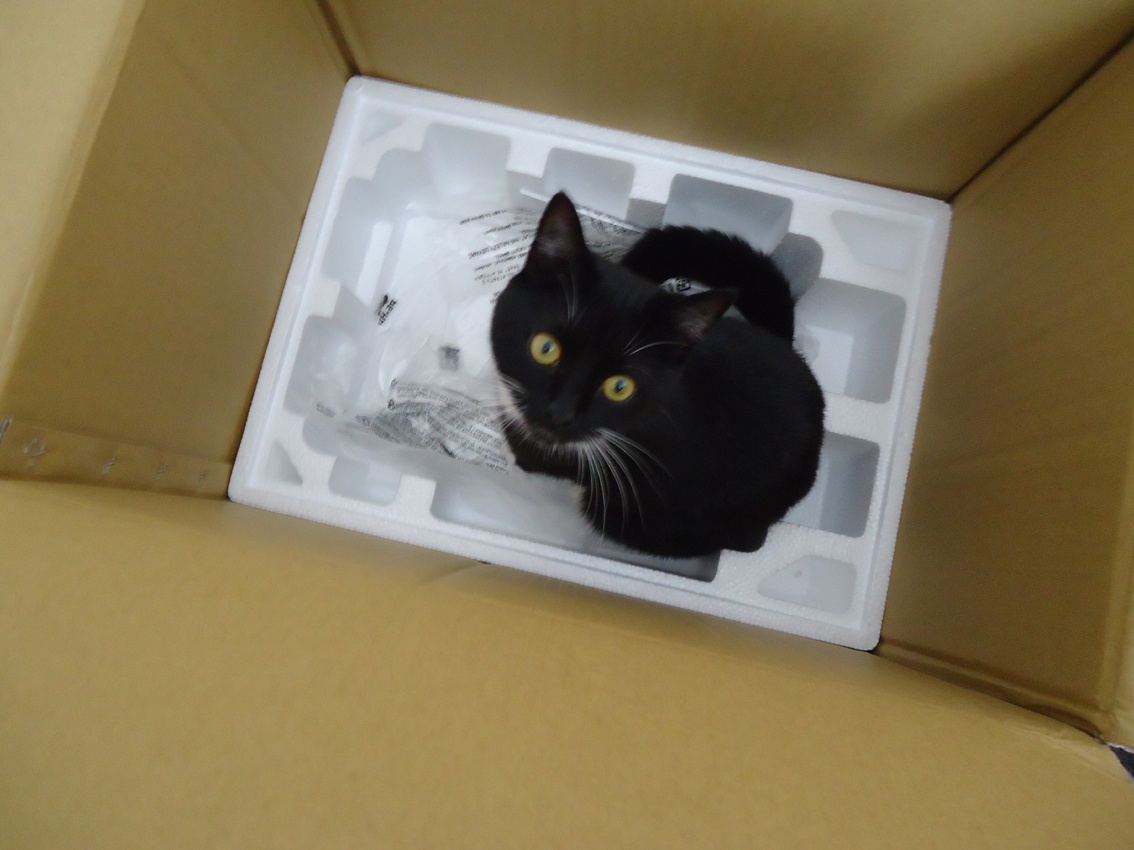 At least Harri is happy with her new box 🙂
.
I’ve been collecting a few tutorials onto a Pinterest board, most are specific to the Janome but there’s some great general info as well, feel free to take a look:

That’s it, phew!
I am excited about all the things I can sew with my new machine and so is NH. He thought the variegated thread that was in the store machine was very cool and then I made the mistake of telling him about the fluorescent, the glow-in-the-dark and the colour change thread spools I’ve seen on the Gutermann rack at Made Marion…oops 😉

I realize this is an old post but I just found it on Pinterest – I have to say it is the BEST review I’ve seen since I started investigating cover stitch machines. I’ve read about all of them but my Janome dealer is exactly 1/2 mile from my front door and they’ve been in business for over 50 years, most of it in the same building where they are now. Still haven’t decided whether or not I actually “need” a coverstitch machine enough to justify the expense so your review was particularly helpful.
If you are in the market for a sewing machine, the Janome 9400 is absolutely amazing.
Pingback: Crossing Off The List: Soma Swimsuit | the curious kiwi
I’m super excited to have found your post! I’m on the hunt for a coverstitch machine, and am thinking that this might be just what I’m after. I will also look like I’m collecting machines from all the brands (Husqvarna sewing machine, Bernette overlocker and hopefully a new Janome soon!). Good tip about the stablizer, I’ve seen stabilizer as a glue stick and was wondering if anyone has used those ones. I’m definitely going to be sewing some lightweight merino, and will stock up on stabiliser. Does your Janome do a good job with bound hems (like on baby clothes)?
I’ve never seen the glue stick stabilisers and I wonder if it would pull the fabric as you applied it, especially on very stretchy knits? Worth a try I guess! 🙂 I have to admit I have only used my binder twice, it’s pretty fiddly to set up but it did a good job.
I am in the Uk and have just bought the Janome 2000CPX, having done (too much) research and testing this and also the Juki MCS1500(no free arm or clear foot option)
Reading some of the comments about skipping stitches especially on thicker seams.
In US they have a tool called a ‘hump jumper’ but not in UK; however having seen a wonderful Singer video on YouTube(Yes I know Singer) for a Singer Clearance Plate I then found an identical new Husqvarna one for £1.50 easily available.
The You Tube video is well worth watching, so much so that I have sent this reply to you.
Happy Sewing
Hi Sue – I have something similar to that. I have heard the term “hump jumper” but I believe my one was marketed as a “jeans-a-ma-jig”. I have never thought to try it with my coverpro but what a great idea as stitching over thicker seams can break the looper chain. Hopefully the gap in between is big enough for all three needles…Thank you 🙂
Hi. I have one of the Janome overlocker/coverstitch machines. I mostly use it just for overlocking but this is mainly because I can’t get it too stop skipping stitches (left needle only) when cover stitching, I went back to Janome for extra lessons but as soon as I brought it home again the stitches started skipping again. You mention something in this blog about changing the differential feed but no details! Can you explain please? I’m kind of desperate!
Hi Jen, you just need to adjust the differential feed and test. Use small increments and usually it’s a lower setting that works for me. Also be careful you aren’t tugging the fabric through, let the machine feed by itself. I found that was a bad habit I didn’t even realise I was doing. I hope that helps 🙂
Hello, mine is skipping too, thanks for this I will fiddle with the differential it’s driving me crazy!!
Thankyou so much for this post! I am in the process of looking for my first Coverstitch machine, and this has just swayed me to go forth and get a Janome. I cant wait!
I got my 1000cpx a year ago and I find the skipped stitches on intersecting and bulky seams really annoying. Help! Can you share some tips on how to avoid skipped stitches please?
I struggle with that sometimes too – the technique that I find works the best is the clipping method shown here. It flattens the seam enough to sew over. Also don’t be tempted to tug the fabric through to “help” it (a bad habit I had from using a normal sewing machine) let the foot and feed dogs do the work. Easing off the foot pressure can help too 🙂
Does the Janome allow using a special cover stitch needle. My Bernina 1300MDC allows an extra long needle which makes all the difference in skipping stitches. However, it does not handle as much fabric as a regular machine. I thing, but haven’t tried using a leveler like a jean jig to minimize hump jumping in heave hems or seams.
Hi Karen, it uses the ELx705 type needles – they look about the same length as regular needles but they have a groove down the front face similar to jersey needle.
I am a new seamtress but looking forward to trying out a coverstitch machine…I have a serger that I love…now time to try sewing knits etc and working with a cover stitch…it is strictly a luxury purchase it seems
thank you for the work you did as I was going through all the comparisons after seeing the Janome in action.
I have ben a keen sewer for over 40 years and sold my very old Bernina and stepped into a Janome 6600, amazingly intelligent machine and it won over the Bernina, firstly on service at the outlet and secondly it mean dollar difference allowed me to buy a Janome Gem for those weekends away with friends sewing.(I got a travel table with insert to fit, worth the investment if you go to classes or stitch groups, mine is a sewezy)
Husband was so impressed he bought me another Janome, heavy duty straight sewer for the quilting frame.
This week my newest machine will arrive via Auckland Sewing Centre who have given me very good service with accessories and parts to date and I would expect that won’t change.
Again thanks for doing the leg work and thumbs up for backing good service, hugely important to support those who give it
Great post. I went into my dealer and she showed me differentl brands then we went to the Janome Coverpro 1000CPX. Excellent demo then she unthreaded so I could do it. (So much quicker and easier than my old overlocker). Then I did all the testing. We went over how to start and finish. I love mine. But it would have been nice to at least get the plate.
Thanks Val in Ontario Canada.
Hi from San Francisco, and thank you for this excellent review. Are you still happy with your choice? I have a Janome serger and it’s a little finicky to thread, but the stitching is even. This is my second one – the first one gave out after 20 years, so not too bad.
I have a question – what is “merino”? Is it wool jersey? I wish that were easier to find here. Is it always a solid color?
Hi Lynn, thank you 🙂 Yes I am still very happy with my choice but it is a very different machine to my normal sewing machine and my overlocker (serger) so it has taken some patience and experimentation to get used to it. I am very impressed with the quality so I would definitely consider a Janome again when my Elna sewing machine needs replacing.
Merino is 100% wool 🙂 it’s nice and stretchy and very finely
wovenknitted so a lot like a jersey. You can also get it as a blend with a little lycra in it. It is dyed in solid colours from black to bight pink or it can bewovenknitted into stripes, or even with a textured pattern into it. Do you have The Fabric Store in San Fran? They should stock some great NZ Merino for you to try.Hi, just wanted to point out that the merino you refer to is “Knitted”, definitely not woven! It’s a merino knit, commonly available here in NZ. Sorry to be finikity! This post is EXCELLENT! And perfect for my recently inspired desire to acquire a cover stitch machine. By the way, Wellington sewing services shop has recently changed hands…..here’s hoping the new owners know their stuff like the previous ones!
Hi Katharine, I must have had a brain mis-fire while typing that comment, of course merino is knitted, thank you for picking up on that.
I saw they were up for sale, so someone has purchased? I too hope the new owners can live up to the excellent knowledge and service of their predecessors 🙂
Hi! I just read your blog and recently purchased the Janome overstitch 900. I’m still struggling with the machine, tunneling, etc. I also don’t know how I’m supposed to end where I’m sewing . Right now I pull the top thread and shimmy out the fabric and I have to tie off the ends, so it’s doesn’t unravel. Is that how it is with your machine too? Do they even sell cover stitch machines with reverse? Thanks from Hawaii!
Hi Stacey, I really recommend the wash away stabiliser. With some fabrics it doesn’t matter what tension you use, they just need that extra thickness and stability from a stabiliser.
To end your sewing, this is what they showed me in the shop: Stop with the needles at the highest position, lift up the presser foot. Get your tweezers and hook onto the needle threads, pull them towards you. Click the threads and then pull your fabric backwards or sideways out from under the raised foot. As you pull the fabric the needle threads will get pulled to the back and you can knot them or just snip them off. I find that if I hold the line of stitching and wiggle the hand wheel slightly forward and back as I pull the fabric then that helps loosen the tensions to the threads pull through easily. I hope that makes sense! 🙂 Maybe I should make a video, haha 🙂 I know it sounds fiddly but I think like on overlockers/sergers, there is no reverse on a coverstitch either.
Such a great post and from a fellow kiwi – yayyyy. I just got a beautiful Elna overlocker for Christmas from Wellington Sewing and only purchased it from them because they were so freaking amazing. Now of course I want one of these machines. Might have to butter up the husband.
Hi there. Thanks so much for this excellent post it really helped me decide to get the Janome which I ordered through Wellington Sewing Services as all the reviews I’ve read on their service and knowledge has been fantastic. It’s a shame I live in the far north and can’t visit their shop 😦 I love sewing knits and my Janome overlocker is fabulous but I really wanted a coverstitch for hemming etc. (like you I’m pretty fussy about a professional looking finish). My new coverstitch machine is arriving today and I can’t wait to get going! Would love to see more posts on what you have done with yours. Thanks again for the great info here and keep up the great work..
Hi! Thanks for such a detailed post. 🙂 I just bought my Janome Coverpro less than a week ago, and – surprise, surprise – I’m struggling with the tunneling issue. I am working with a slinky (but not too thin) knit, but I really don’t want to use stay tape – I know I should be able to get it flat without, because I used the same fabric with a Brother coverstitch and the stitching was flawless.
So – would you mind sharing exactly what numbers your tensions, diff feed and stitch length are set at when you have the most success with stretchy/slinky knits? I have been trying different adjustments but with the number of permutations, I could be at it for weeks…hoping not to wait that long before I get a nice garment!!
Thanks again!!
Hi Nokes – I am afraid with a super slinky or thin knit no tension setting will work to get rid of the tunnelling. You need to stabilise the fabric to help the machine. I mention a wash-away stabiliser in my post – try and get your hands on some, it’s amazing. I use it on thin merino when I am only stitching 2 layers. Lay it on top or under the seam as you stitch, then simply swish it in water. It dissolves away and you are left with a beautifully stitched seam 🙂
Hi there, just for the record I am an ex-Kiwi living in Adelaide, Australia, and reading this made me a little homesidk … anyway.. about Coverstitch Machines… great article and sew very informative…I have just purchased a second hand (I never seem to buy anything new) Bernina 009DCC, used only twice(?) but in original bx and in A1 cond. (and for just $100 .. yes there are a lot of cheap machine in Oz from time to time!! … I am happy with it, but the best C/Stitch Machine I have ever used, and regretted selling since is the Bernina 2000DCE.. I think it does most of what your new machine does, and sorry, but I am a Bernina Lover from way back, it is a sturdier machine than Janome’s and similar…I wish you had been able to test-drive a 2000DCE as I am sure you would love them too!! I am pleased you are happy with your new machine, and after all it is a personal choice and YOU are the one who is using it!!
– Sew glad I stumbled across your blog… and will continue to read your entertaining ramblings in the future (meant in the nicest way possible!).
Hi Mary – Wow, $100! That’s crazy, well done you, I would have snapped that up as well. I didn’t bother looking at the Bernina 2000DCE as I already have a Bernina overlocker and I wanted a dedicated machine. My Bernina 1150MDA is amazing though so I totally agree with you that Bernina make fabulous machines and I wish I could have tried the new Bernina Coverstitch but I was impatient and it’s hard to find all the options here in NZ. I am still really happy with my Janome and I think when my Elna sewing machine finally needs replacing then it will be off to both Bernina and Janome for a battle of the machines! 😀 Happy sewing xx
Greetings from middle US! Thank you for your thorough review! Do you still find you need stabilizer with cotton Lycra knits? I was hoping a cover stitch machine would eliminate the need.
Hi Ellen, I haven’t needed it on cotton lycra knit or straight lycra. But I have needed in on light-weight merino – it’s not a fuss really and I had the same trouble with twin needles, but much worse. I think it is unavoidable really.
I did pick up the Coverpro 1000CPX (I posted below a few months ago when I was *thinking* about it) and I’ve been using stabilizer for thinner slinky knits. But I’m wondering about tension. With a twin needle on a standard sewing machine, lowering your tension helps reduce tunneling. Therefore, would similarly adjusting the tension on the Coverpro allow you to forgo the stabilizer? I haven’t had a chance to test-drive this theory yet.
I think it’s just that you can only lower the tension so far before the chain just isn’t stable enough itself but I would be interested to hear how any experiments go for you 🙂
Thanks for your blog. Tomorrow I’m going to “test run” a coverlock. Like you, I have a sewing machine (Bernina), an overlock machine (Bernette) and I would like to add a coverlocker. On the internet I found your machine. Good price. The Bernina is very expensive so I won’t buy it. I do not know how many times I’m going to use the machine so an expensive one is not a good idea. I live in the Netherlands and can follow your blog just fine, just the part about washable stabilization I did not quite understand. Good tip to take my own material to the test. Thank you!
Hi Alice, how exciting! It sounds like you have a good idea of what you want 🙂 The washable stabilisation tape is like a strip of interfacing. It is great for lightweight fabrics that might “tunnel”, sometimes it doesn’t matter what tension settings you use, light weight fabrics will sort of bunch up and make a tunnel underneath. If you apply the washable stabilisation tape first, along where you will sew you seam, it adds some extra thickness so that the stitching will lie flat and not bunch the fabric. Then you can soak the fabric after stitching and the stabiliser just breaks down and disappears. Does that help? 🙂
thanks for the review
I meant the binder and attachment plate…. It’s too late to be surfing the net!
I love my Janome Cover Stitch too! I managed to pick up a binder attachment plate from a shop in the UK for less than $150 on special. Now all I need to do is find the time to learn how to use the binder….
What a great review post! I too am thinking about a coverstitch, although I’ve been working with thin knits and am wondering if I would be happy with the results. Although I just got my new “regular” sewing machine last week so perhaps it’s best if I exercise some patience! lol
Hi, I wanted to thank you so much for this review. It helps me a lot. I’ve been considering buying a Baby Lock but I didn’t want to buy the top of their line as they are so expensive. I also don’t fancy all the changing over to cover stitch each time I want to finish a garment. I love the look of the wide bed of the Janome and the fact that it is easy to thread. I looked at the Bernina cover stitch machine and but to thread the looper you have to open the back and Left side to thread it. That’s just too hard. I’m going to see if they will have a Stitches and Craft show special at the dealers. I have cupboards full of stretch fabric and its just been too hard to get a nice finish on them.
Cheers Bobbie Qld Australia
I enjoyed this post so much! Thanks for sharing how you decided on the machine you did and taking all those pictures of the inside.
I bought a overlocker/coverstitch combo machine a few years ago (used on eBay) and I still have not gotten around to trying the coverstitch. Embarrassing, I know… I finally got somewhat comfortable with overlocking thanks to a book and some online tutorials, but there is just so little help out there for coverstitch. That Pintrest board you created just might give me the courage to buck up and try it… thank you so much!
Please, could you write a little bit more about how to correct skipped stitches by adjusting the differential feed. Thanks !!!
Hi Lucie, I haven’t experienced skipped stitches yet myself but the man at the shop assured me that if I ever do to just twak the differential feed and it should fix that. Not sure which way, I guess just give it a go. The differential feed on a coverstitch works differently from an overlocker, that’s why most people don’t realise you can tweak it for skipped stitches. Good luck 🙂
Thank you very much 🙂 I am going to try it. Greetings from Europe.
I just bought one of these of Trade Me and am so happy with my purchase. The first garment I made had some issues with tunnelling that even wash away stabiliser couldn’t fix but the weight of the fabric was very light. I spent up at the recent Fabric Store sale on merino in anticipation for sewing up a storm for autumn/winter.
Oh you’re so lucky, I was watching TradeMe in the hopes of a bargain 😉 The man at the shop did say that lighter weight fabrics and some light merino can be difficult with tunnelling. I think it’s a very kiwi specific problem 😉 since we love our merino so much…I’ve been pulling my merino pieces out of my stash, ready for winter too.
Glad to hear you’re enjoying your coverstitch! I have the same model which I bought a few years back, I bought it online in the UK as my dealer in NL had just retired (and the price difference was too big not to) I haven’t used it much yet, I struggle to get a nice stitch (loads of tunneling) whenever I set it up. I really should give it another go as I have lots of knit fabric in my stash. Will refer back to your post when I do!
Hi Anne-Rose, I really recommend the wash away stabiliser, it seems to do the trick. On very lightweight fabrics it can still be a problem but maybe using the stabiliser will help you 🙂
Hi,
mine just arrived today and I totally love it.
You are completely right about the manual, I find that it has a lot of information , even for tension settings .
I`ve got the machine together with a bonus pack, the extension table, clear view foot and an elastic foot. I am the most happy with the extension table as i find the work area in front of the needle so small…. or maybe I am not used with it.
Anyway, after a few test stitches I understand why you ( and others) are so happy with this machine. I love it!!!.
Thank you for the great information in this post
Great to hear you love your machine too! 🙂
Oh how awesome!!!!! Thanks for such a fabulous detailed post on the matter… I’d love to own one of these one day (although I’ll probably buy an overlocker first! ha!). And it’s funny because it was just the other day I was looking at my beau and wondering what type of machine does chain stitch like that – and now I know 🙂 I hope you get lots of use out of it – it looks like it’s going to be a fabulous machine!
It’s amazing how many coverstitich stitches I notice now on rtw clothing 😉 An overlocker is definitely the next step, I love mine, improved my sewing 1000%, you won’t look back!
I bought mine a little while ago and haven’t used it quite as much as I thought – but when I do it is absolutely the right thing. I treated myself to the binder and it is a little more challenging than I expected. When it is right it really looks good.
It definitely isn’t used as much as my other machines but when I do use it, it’s perfect 🙂 Glad you love yours too. I bought the hemmer last week, it takes a little bit to set up but now my hems are beautiful. I’ll play with it a bit longer before I think about the binder, the youtube videos make it look amazing 😉
It is great – but it isn’t as easy as I had hoped.
I bought my new Janome sewing machine from Wellington Sewing Services this time last year and the service experience was exactly the same – I got the full comparison of all the machines similar to what I had and within my budget and got to test drive, shown all the features. I would love a coverstitch, but *sigh* not in the budget for a wee while yet. Enjoy – I can’t wait to see that Lace Ensis all cover-stitch pretty!
I’d never considered Janome before and I can’t believe I’ve lived in Wellington so long and never been to WSS! 🙂 Its a dangerous shop…and the Lace Ensis is definitely on the cards 🙂
I’m glad that Wellington Sewing Services found another customer! My mum and I picked out my very first machine in their store for my 21st birthday years ago. The proprietor was so incredibly knowledgeable and helpful in selecting the right machine – I only wish he was cloned and could have helped me out over here in the USA! I’m been shopping for a new machine for weeks, and finally ordered a Brother PC420 – they have a much wider selection of machines in the US. I’m rather excited to get it, it has so many more features than my old basic mechanical Janome!
A little bit of good service goes a long way 🙂 Yay, new sewing machines for EVERYONE! 🙂
Nice post! I recently got one as well and I’m super happy with it.
Here’s what my husband said when he looked over my shoulder: “oh my god, you’re reading sewing porn!” Thank you for that! Enjoy your machine and all those cool kinds of thread. Maybe I should jump on the bandwagon of overlock/coverstitch machines, I have a birthday coming up after all…
Ohh sewing porn, brilliant, I love it! 😀 A birthday is the perfect excuse to jump on the wagon…
Thanks for all the info – I’ve been thinking really hard about a coverstitch machine, trying to decide whether I sew knits enough or not but I think after seeing the neat lines of that stitching even the few things I sew in knit deserve a good finish! Need to make some space in the sewing room…..
When I first started thinking about getting one I did struggle with the fact that it is a specialist machine but I do love a neat and tidy finish. So it is a bit of a luxury but if you can afford it, it’s a great investment…you’ll find room 😉
This one is on sale at the moment at my local sewing machine shop, I sooooooo want one!
Ohh the magic ‘s’ word! 🙂
I finally bit the bullet, went into my local sewing shop, knowing the sale had finished. Thankfully I took hubby who completely sweet talked the assistant and I got it for sale price. So far I have opened the box and taken the booklet out…
Oh my, you are lucky! That is such a clever machine! (She says having known nothing about a coverstitch machine!) Can’t wait to see examples. My sewing machine is a Janome and I really like it.
I am really impressed with Janome, I don’t know why I’ve never looked at them before.
Now, give me 30 minutes alone with you and my overlocker and we’ll get you hooked!
Did you ever try a Baby Lock? We found that Baby Locks are much more convenient in our classes. We sold out most of other brands, except the small JUKI as an beginners model.
best regards from Switzerland.
Hi Peter, I wasn’t able to find a Babylock to test drive, but I have heard great things about them and Juki 🙂
Oh my you are one lucky happy girl. Congratulations on your new pet (move over Harri!!!?) and I bet it has been getting some serious test driving and real use already. I love my Bernina coverstitch …. sigh.
How lovely you are to include all that info with quick links too. Clever and kind. Thanks Mel.
PS I need to check out the thread racks more often …. glow in dark? Ooooo
Harri gets very jealous of all the attention those shiny white boxes receive but she’s only wee, it doesn’t take long for her to tucker out and settle down for a nap 😉
The glow in the dark thread is neat, the colour change is even better, looks white, changes to a colour in the sunshine…kind of like the hair of a barbie doll I used to have, that must be why it appeals to me.
Barbie had glow in the dark hair? Really. Wow I missed that one.
I wanted one before and now I really, really want one. The binding attachment although pricey and big learning curve to use well sounds really worthwhile from what I have read on other blogs. Can’t wait to see what you make with it.
I watched a few videos of the binder attachment, it looks easier to use than some of my basic sewing machine feet. But baby steps 🙂 I’ll start with the hemmer and make a few things, then I think I could justify the extra attachments, plus there is all that stretchy fabric in my stash calling to me… 😉
I’ve been dying to buy this machine. I’m going to save up, if I sell enough leotards this year. I will hopefully be able to justify buying one. So jealous!
Oh I wish I could have one of these, in reality I don’t really sew enough knits and well should probably buy a new overlocker first seeing as mine has been out of action for 7 months!
But YAY isn’t it so much fun getting new Sewing toys!
Bookmarking this!! That Janome Coverpro is on my list this year. Must have been a lot of work to put this great post together! Thank YOU!
Yay 🙂 You will love it!
Congratulations on the new addition to your family! 😀
I haven’t ventured into the world of knits, something I do hope to remedy this year.. Me being me (love gadgets), will so want one of these when the time comes… great post… and enjoy your new toy.
I got this very same machine last year – I love it!!
Yay, I’m glad you love it too. Was going through all my stretchy fabrics on the weekend, look out stash! 🙂
Ooooh, such a shiny new toy! You know I’d pretty much talked myself out of getting one, and here you go convincing me to get one.
The service is so important in buying a good machine – it’s funny how people don’t seem to understand the difference between good service and sales these days.
You put it perfectly, there is a difference between sales and service, exactly. I didn’t even think to shop around for that machine once I’d chosen, it’s good to support someone who really looks after their customers, so hard to find that these days
oh goooddd. I did not read the post yet but I m allready happy you have written this. I am waiting for my cover 1000cpx on tuesday, so yeey …:) Enjoy yours!!! I will come back with comments after reading 🙂
So excited for you! 🙂 Yay for coverstitch fun xx
Yup, you’re right, it’s a long post but worth reading! Thanks for sharing. I really need one, will start saving up after reading your post ✂️
Happy coverstitching!
Thanks for reading, I hope once you’ve saved up you can find the perfect machine for you xx