

Burda instructions have a reputation for being hilariously bad – and they deserve it!
If you are used to sewing envelope patterns from the Big 4 or beautifully illustrated independent patterns then you are probably going to be left scratching your head a few times.
I can’t help much with a crazy instructions but please don’t be discouraged. I’m not trying to scare you off, just giving fair warning.
What I am going to do is help you pull apart the main gist of the instructions and tell you how I get around crazy confusing sentences that seem to have been made up by an ad-lib translation program!
(click on any of the images below to view full size and to read the text clearly)
First of all you should be familiar with this first page, it is in every issue and outlines some basic sewing symbols and some tracing help. We’ll get to the tracing in my next post.
I’ll be honest, I actually only read this in full the other day myself, before I have just glanced at it – I actually learnt a couple of new things, like a dotted outline in the cutting layout means that pattern piece is placed upside down on the fabric, I must have been pretty lucky so far!

The difficulty ratings are also important to know. Basically the more dots, the more difficult and involved so choose pattern that suits your experience but also don’t be afraid of a challenge, you might surprise yourself!

Ok, now let’s get right into it with a real example, this is Skirt 121 from February 2012

I have broken the entire instructions up into sections to explain some important points.
First up, the basics: sizing, pattern pieces and where to find your pattern for tracing.
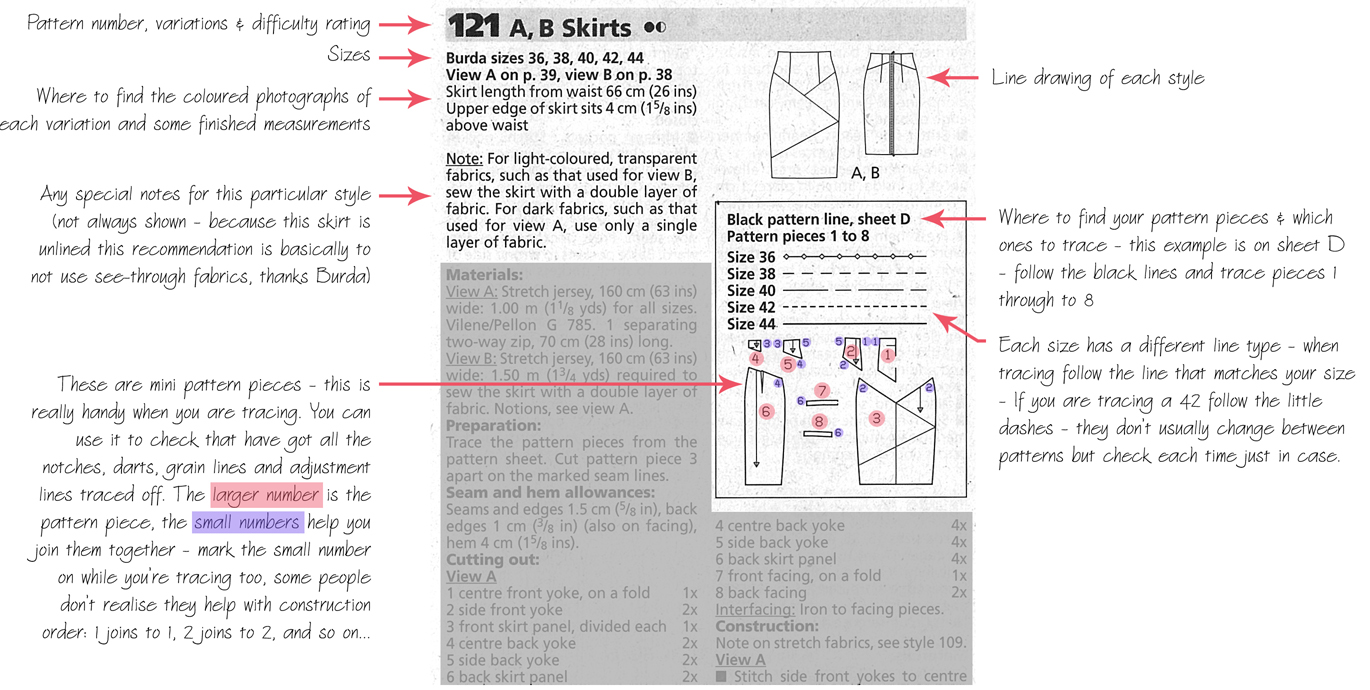
Now let’s look at the fabric recommendations: 
Here is a more complicated example of fabric allowances. The first thing that confuses a lot of new Burda sewists straight up is how Burda list the sizes and fabric allowances. The secret is in the note at the top of each page, you might have missed it or not really understood what it referred to,
“Different figures for the different sizes of a pattern are given in the instructions, one after the other, separated by dashes. If only one figure is given, it applies to all sizes.”
Uhh wot? Yeah I know! But here is a colour-coded version of how I analyse it:

The seam allowance recommendations and cutting layouts are next followed by the construction “instructions”.

Here is where things can get tricky. I’ve been sewing for a while so I know the general construction order of most garments. I usually skim through the whole thing to get an idea of that particular garments construction order and to see if I spot anything weird or out of the ordinary.
Next I read through each bullet point with my pattern pieces ready to go and start sewing.
I sew through each point until I get stuck. It’s a good idea to take note of what each pattern piece is called in the Cutting Out section. Sometimes reading ahead helps you understand what is going on, or it might confuse you even more.
When I get to a confusing part I read it through a couple of times, pinning pieces together to help me visualise what is happening. If I am really not sure but need to move on to the next step I baste the pieces together. Sometimes after the next step or two it becomes more clear what is happening.
The key is visualisation. Don’t panic as you read through, instead pick up your fabric pieces and try it out.
Use the mini-numbers I pointed out in the first instruction image (purple dots) they will help guide your construction order and which piece joins to which.
Using instructions from other basic envelope patterns in your stash can also help.
If that all sounds like waaay too much don’t fear! Each month Burda illustrates one pattern in their “Sewing Course” section, and sometimes it’s a really good pattern, like this dress 117, also from February 2012.

Ok, that’s about all I have for you right now, it’s not a lot I know but I hope it’s helped you through the mass of text that makes up the middle of a Burda magazine.
One more thing, Burda also include instructions for lengthening and shortening patterns as well as how to grade a pattern up or down (I have personally used this method with great success!) I’ve scanned these in for future reference, you can find them here, just scroll down to the very bottom.
It’s awesome to read all your posts outlining your Burda collections and chosen items. Some of you have already made 2 or 3 things! Thank you also to everyone pinning to the Pinterest board, let me know if you’d like to pin too and I’ll invite you!
I’ll reveal my chosen Burda pattern and show you how I trace it next post. It’s nothing special, just more of me trying to encourage you and reverse a few Burda myths (spoiler alert: it’s not that hard!) 😉
Happy instructioning!


Hi there! I’ve just bought my first Burda paper pattern, and really wish I hadn’t! It’s a lined V-neck dress, fairly simple, and I think I can work it all out EXCEPT it calls for interfacing at the neck and there is no pattern piece for the interfacing. Is this usual? I’ve just taken up sewing again after about 40 years and, while I can follow patterns, I’m not very good at doing ad-hoc stuff!
Hi from France!
I am a native English speaker but have been living in France for over 30 years so am fluent in French too. I have years of experience sewing garments and Burda patterns are the best for style but definitely the worst for instructions. Sometimes (not often) the weirdness can be alleviated by comparing the instructions in both languages and getting a clearer idea of what to do. I’m currently stuck on a supposedly “easy” baby’s playsuit. The contrasting strips where the snap fasteners go between the legs are supposed to be cut out without a sewing allowance whereas the edges you attach them to have an allowance. So where is the sewing line??? The end result is that there is no room to fit the fasteners on the strips. It’s also not clear either whether they should be folded back (so as not to be visible from the outside) or not. The diagrams don’t show this stage! Im going to cut them out again with an allowance this time and hopefully that will work. I have puzzled over this for hours and see no other way to do it.
Good to know I’m not the only one tearing my hair out 😉
I am so happy to read this! I purchased a PDF pattern from them on the weekend so I could make a costume for my daughter, but as it’s been a while since I’ve used a paper pattern I’m struggling to make sense of it! The understanding is coming slowly but surely, but sheesh…. this is confusing!
Crikey, happy I read this. I’m a near-complete novice and bought a Burda pattern for a jacket (6351). It’s only now after cutting all the pieces and doing the interfacing that I noticed the four dots of doom on the packet. Step 15 is setting in the sleeves and step 25 is actually sewing the sleeves, so as well as being able to sew, you have to be able to time travel. On top of that, I have to make quite a number of modifications to the pattern. I’m pretty sure that if I followed the design in 28, it’d summon something that only the Ghostbusters could put down. I’ve read the instructions six times and still have no idea how to attach the lining.
Hi I wish I’d found your article before embarking on one of the Burda skirt patterns! This is my first time at making any article of clothing and It should be a simple long a-line skirt but I’m flummoxed by the dreadful instructions. I was almost put off sewing for life! I still don’t know how I’m going to finish the skirt as I don’t understand how to do waistband and zip but I’m sure I can find somebody to help when we are able to have human contact again!
Hi Jacqui, sorry to read you’re a bit stuck with the Burda instructions. They expect you already have some basic sewing knowledge which can be frustrating. If you can push on I think they are really good value for money and sizing/fit is very consistent. I often have to re-read an instruction several times myself. I find a good sewing book really helps to look up techniques and I’m always referring to me Readers Digest Complete Guide to Sewing. Try and find a second hand version, they’re all the same, no need to splash out on the brand new edition. It goes through waistbands and collars etc, with great diagrams. Good luck xx
I hope I have not made a mistake. I already cut out the pattern before reading your article, but I did chose a size larger than I am due to the tight fit of the dress. Will this work for the seam allowance?
Hi Eve, cutting a bigger size isn’t a good way to substitute for adding seam allowances. It does talk about adding seam allowances in the instruction sheet so you’ll just have to see how it works out. You need to chose your size based on the size chart and if you want a loser fit than going up a size is a good idea.
I don’t know how to thank-you enough for this (and the other Burda related info you’ve posted) without seeming over-the-top! I have been a long-time fan of looking at Burda patterns but have recently (after a mere 50 years of sewing, lol!) purchased my first Burda paper pattern and needed help. After poring over the pattern instructions and info boxes printed on the tissue, the pattern pieces, and trying the US and UK sites, I’m a bit overwhelmed. It’s hard to find a copy of BurdaStyle magazine here in the hinterlands of Scotland, lol, so I’m taking it all very slowly – I really want this top (Burda 6972) to be right after construction! The help you’ve provided may have cracked it for me, so thank-you, thank-you, thank-you!
Aww thank you Sunnie, you’re very welcome, it’s so nice to read how much I have helped you. I don’t sew much from Burda these days but I still love flicking through the magazines. They are a great resource, so many patterns in one location and their draft is very good. I hope your top works out how you want it, please come back and share a picture with me when your done. Happy sewing xx
Thank you! Read everything and feel more prepared to proceed. Had been scouring the web for the “real” instructions to the Burda boxy jacket #107. LOL
So there aren’t any, huh? Could you tell me why there are so many patterns numbered as #107 in the Burda world? As you can guess, this is my first Burda pattern. I plan to make this up in grey linen using black linen instead of leather at the elbows. I am short and busty, so have to alter the pattern quite a bit. I was planning the add bust darts in the front panels, not the overlay. Do you think that might work?
Hi JJ – It is a bit crazy that Burda number their patterns the same each month! It’s tricky to look them up without a month and year as reference and there aren’t any more detailed instructions other than the text in the magazine. When I get stuck I sometimes look at a similar pattern from one of the envelope brands, they usually have diagrams. It sounds like you would need to do a FBA (full bust adjustment) you’ll find lots of tutorials online. Might be a good idea to whip up a quick muslin from cheap fabric to test your fit first so that you don’t ruin your good fabric. Best of luck! xx
Thanks for the suggestion on using an envelope brand as a guide. Have found some good guides on FBA online and will use them and muslin to place the darts. Your site has been a hufe help to me!
OK, this comes really late… but I wanted to share my opinion.
I guess I must have had basic-intermediate level of sewing knowledge when I first started using Burda Patterns (40 years ago, and I was 10 years old and Burda only came in German with the instructions translated into Spanish, that changed around 1994-1995 when the mag started to be published completely in spanish – and it was of worse quality too) because I never had any problem with them. Oh yes, I have been sewing since I can remember.
The main concern at that moment was to trace the patterns, because the magazine had so many models (much more than they offer now) much more complicated and fitted than the models offered these days, and the pattern sheet was quite cluttered with lines. As I had very good sight, I traced the patterns for my mom all the time with little hassle. Said that, I barely read the instructions for very complicated models, I assume that all the years I passed with Burda made the thing so much easier. The instructions were better years ago, that´s also true. I cannot remember instructions given in only one paragraph… perhaps that looked a lot to me being 10 Y.O.
Burda also published several books about sewing, and they probably assume that people buying the mag also read those books.
I am from Europe, from Czech Republic to be exact, and I grow up with Burda patterns so I got used to them as they are without SA and their style of indication how much fabric is needed, it’s natural to me. But I have to admit their instructions are sometimes confusing a lot but when you are only a bit experienced you already know how patterns work and you are able to deal with it nicely. Recently I got some Butterick and MCCalls patterns and the included SA are so comfortable! But they make altering complicated as I found out.
Hi I just bought my first Burda magazine last night. Thank you so much for these brilliant tutorials. I feel so much more confident to take out the staples now!!! 🙂 Sara. (very new sewer)
About Pellon brand interfacing–once you try a professional grade interfacing, you will never go back to Pellon. To me, Pellon feels like paper, no matter which weight you are using. I am a fabric snob so I pay the extra money for quality materials. Just my opinion!
This is my first Burda pattern and wow-wee this is awful! I have a pdf version and quite frankly these people are serious idiots. However, I do like their styles so I’ve spent about 3 days trying to figure out the Army Jacket #105. here’s my first problem:
1) When laying out all the pieces and taping together I’m left with pattern piece 11 which does not show up under “Cutting Out”, “Drafting”, or anywhere else. It is basically a square with a slight curve, a fold line with the wording: facing fold (and some foreign language on top on bottom). Piece 11 states it is a straight grain line, HOWEVER, the line is diagonal. hmmm…I haven’t sewn for quite a while but don’t the grain lines depict how the pattern piece should be placed on the pattern? If this were true, wouldn’t this piece be on the bias rather than on the straight grain of the fabric? Or do they mean the piece should be placed diagonally on the pattern. But there are no notches, little numbers, or any other symbols.
I’ve gone over and over the instructions. oi vey. I’ve made an outline, underlined terms, and have even tried to fit pieces together. I can’t figure out if they have added an extra piece or not.
Under Preparations it does say to trace “front facing from piece 1 (front bodice) as a separate pattern piece” and cut 2 of them. ok, this does seem to make sense when matching up to the following instructions. So where the heck does piece 11/facing fold come in? Did I mention piece 11 is roughly 10″x11′ with slight curves?
My only thinking is that the facing fold is added as a stablizer of some sort and the back extends to the arm and collar. But why the diagonal grain line?
Other problems:
2)The Materials List states 5 Hammer-on snap fasteners. Ok, sounds pretty straight forward. On the front bodice pattern there are 4 X’s indicating where the snaps/buttons should go. But in the instructions it list only a button on the top and a button on the bottom. To make matters worse in the illustration, the model doesn’t appear to have a bottom snap let alone any other snaps except for the one at the top!
3)The front facing fold on the bodice also has no placement for the zipper. I’m guessing from the instructions I just kind of wing it and I’ll figure it out. Def. making a muslin first. No way am I wasting $40 worth of fabric on this.
4) One other odd note is on some markings it says: Mod. 105 and on the same piece or a different piece it will say Mod. 106. For example, On the front bodice I have 2 lower pocket placements. Mod. 106 aligns with the hem and seems to make the most sense for alignment when compared to the line art. Mod. 105 however is about 1.5 inches below the waist and 1.5 inches from the Mod. 106 pocket. What’s this Mod.105 vs Mod. 106 all about? Sometimes it just seems like the terms are randomly used!
Please help!! With no pictures to go by and no help on their website, I’m super frustrated. Thank-you for at least acknowledging how insanely inept the person who writes these instructions are! ❤
Hi Ellie, sorry to hear you are having such a hard time with the Burda instructions. I’ll try and help with what I can 🙂
1) The diagonal line marked as the straight grain line means that you line that up parallel with the fabrics grainline. This may mean it is cut on the bias but it may not necessarily be exactly on the bias so just check. Sometimes they do this to give you some stretch in the piece or help you match it to a curve but this might not matter if piece 11 has been included accidentally.
2) Are the snaps for the pocket flaps and the button are fake stitched on top? That’s the only explanation I can think of.
3) I just looked at the line art of the instructions, it looks like there is a centred line on the front edge of the jacket, it might not be marked as such but I’d guess this is the zipper placement line? Or do you insert the zipper at the top stitching line?
4) Burda often do variations of 2 or more variations in one pattern (this is one of my gripes with the downloadable pdfs, I think it’s wrong that they sell mod 105 and 106 separately from each other when they are mostly the same pattern with a few changes) for example, on a jacket, they might do a cropped version so you would have to cut one piece down, or perhaps not attach pockets. So if you are making mod 105 then only cut the pieces for mod 105. there may be cut or fold lines for 106 on your pieces but you should just ignore these.
I hope that’s helped you a little 🙂
I’m late to the party; however, I plan to read all the posts because if it weren’t challenging enough to follow the instructions in English, I’m using a German Burda magazine. My German is “okay.” Thanks for the help.
Better late than never! 🙂 Glad we could still help you out. The small numbers are the key, even if you can’t read the entire instruction set those numbers are so helpful, they
‘ll tell you the order and which seam joins to which, I think you’ll be fine 😉
Pingback: weekly photo challenge: the sign says | Curls n Skirls
A point you don’t mention is that the numbers on the pattern pieces actually relate to the order that Burda envisage you sewing seams in i.e. the first seam will join up the two “1” markings on the pattern. Sometimes this is enough, other times it just adds context to the instructions.
I agree they help and I didn’t know that’s what they were for until someone told me a few years ago, Burda mention they help you join the correct seams but don’t tell you they also relate to the order. I did mention that in the first image but perhaps it was not clear enough. I will reiterate it in my next post thanks 🙂
Great series. I hope lots of people read it, There is a lot of information in the Burda instruction section if people would make the effort to read it (see other comments!)
Thanks, yes that first page is invaluable but I think most people skip over it and then get stuck when they shouldn’t have.
Pingback: Roundin’ up the Burda Sew-along progress…. | Modern Vintage Cupcakes
Oh, this is really useful. I don’t really read sewing patterns very attentively, preferring to sew by intuition (I function visually too), but I had to guide a beginner friend through a Burda pattern a few months ago, and she kept asking questions and digging in to the details and I realised I had no clue as I had never really paid attention to it all!
Hehe, yes, I too skim over most instructions but when you have to slow down and really explain it you realise how much you just take your own knowledge for granted! 🙂
Very nicely composed.. I too faced this problem with some patterns I downloaded from the site 😀 Some patterns which I have only text instruction too
Ahh yes, the download magazine patterns from BurdaStyle.com are also un-illustrated
Thanks for this – have printed it out and will be my reference.. I actually read the instructions in a mag last night, can I say I read it a few times and still slightly confused…..
I am sure we will all get there in the end..fingers crossed.
Stephanie
Confusion is the normal state while sewing from a Burda magazine, but it’ll work out once you start actually sewing it up 😉
Thanks so much for this! I FINALLY found a newsagent that sells the Burda magazine and bought my first one yesterday. This will be really helpful as I realised they don’t include seam allowances either.
Yay, glad you found a source of Burda! Have fun picking your first project 🙂
Love this – Burda instructions remind me of those riddlebooks we had as kids: turn to page x if you want a, or page y for b, or page z to come full circle…
Oh yes, you so are right! We called them pick-a-path? I loved those, maybe that’s my secret to understanding Burda, hehe!
I’m actually a bit frightened of my first Burda magazine and have not made anything yet. Thanks for posting this, I’m going to print them out.
Do you have any idea if I would be able to trace the item and then use THIS traced line as the seam allowance and then stitch in 5/8″ from there? I know SA aren’t added, but a few of the patterns will be too big, so wanted to scale them down and wondered if it would be as easy as that.
Don’t be scared my dear, just jump in a give it a go! 🙂
Ahh I think you could try to just decrease the pattern size by not adding a SA but it is much better to grade it down properly using the Bura instructions, because the pattern doesn’t grow/shrink in each direction evenly. I know that doing it Burda’s way works so maybe just try it first, doesn’t take long at all.
Okay, I shall print out your notes and have another looksee at the Burda Magazine I have. Thanks!
love how you color coded your magazine! I usually just grab a pen and underline or circle stuff and take notes in the blank spaces. Thanks for the other helpful tips! I think the interfacing numbers are the great Burda mystery. I have never understood those either.
I just thought it would help to explain how I see things, my brain works visually and I am sure other creatives brains do too 🙂
Oh that interfacing! I have only ever seen a “Vilene/Pellon” labelled interfacing, it must be a branded thing.
I wonder if that company pays for the branding or if its just the brand commonly found in Germany.
You might be on to something there – like how all Cross Stitch patterns will suggest the DMC brand thread colour…I remember there used to be a brand called Anchor, they were a tiny bit cheaper and had a conversion chart 🙂
In the US Pellon is the interfacing brand you find in all the big box craft stores. On the bolt edges & interfacing guides it always lists by number which type/weight is best for a particular fabric. Which makes it sound easy but stores don’t stock every type so regardless you’re stuck guessing. So it’s the most commonly available product but not the best quality.
Ahh I see – the suggestions on the bolt sound helpful if they stock everything. And I guess whatever Burda suggests might still change depending on what fabric you choose to make each garment out of. Thanks 🙂
Thanks for these posts about Burda, I have been collecting Burda magazines since the nineties so have quite a few! To be fair to Burda, there is an assumption (at least in the older magazines) that you already know how to sew and they are intended as a guide. English speakers are used to the Big 4. My mother used to sew with Dutch and German magazines (I have a Dutch heritage) and some of the Dutch pattern magazines from the 70s had one paragraph for the instructions! But gorgeous patterns. I can’t wait to see what you have chosen to sew.
You are right, Burda do assume that you have a basic-intermediate level of sewing knowledge. Personally I have never had any trouble but sometimes the translation give me a good giggle and I can’t see how they could produce so many patterns in such short time cheaply without doing the instructions this way. I also think the days of sewing knowledge being taught at school or being passed down are long gone. Now we have so many books and online resources to help even a new seamstress should be able to tackle the Burda instructions without illustrations 🙂