
I haven’t been very well this last week. Nerdy Husband kindly shared some sort of cold/flu malady with me that knocked me out for a few days. I have made a bit of progress with the RNHS Rugby Jersey and it’s looking good. I’ll share that and a bit of Christmas Sewing with you soon.
But first!
Some Secret Sewing that I have been dying to share with you all!
I was really excited to be selected by Tasia to test her next Sewholic pattern, the Hollyburn Skirt, but I was also really nervous because I wanted to do a good job! No pressure or anything!
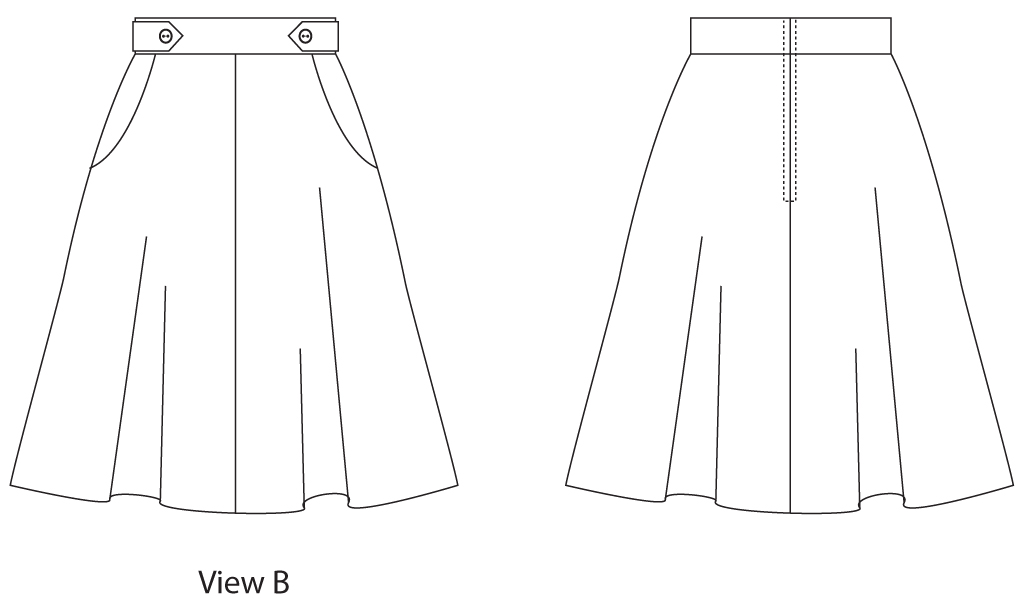
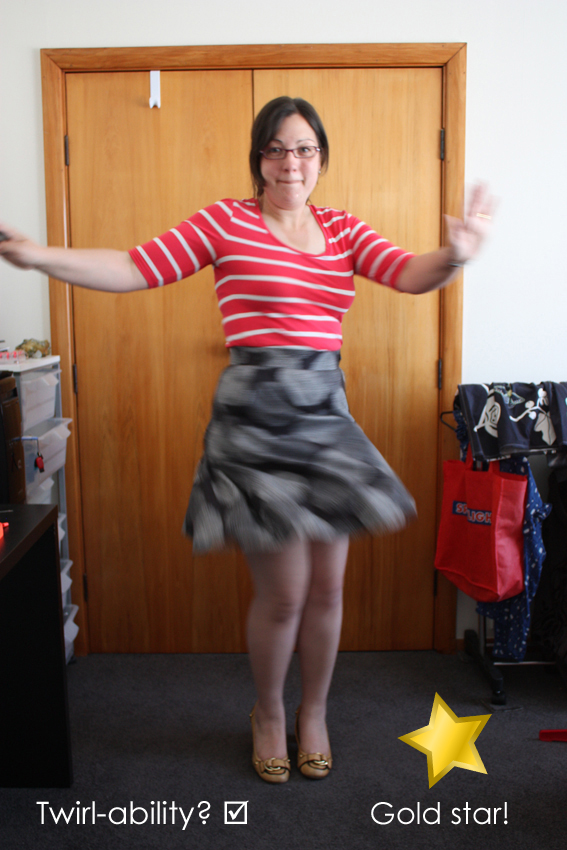
The Hollyburn skirt is designed for the beginner/novice and is a comfy a-line skirt in three lengths (and flare variation), with waistband options and pockets, it also receives a gold star for twirl-ability.

After I saw the line art I was a bit worried because I have never owned, let alone sewed, a skirt of this style before so I had no idea if I would like it or find it flattering for my body shape. I am a “pear” so I put my trust in Tasia’s hands and started sifting through my stash.
Actually that came after printing off the pattern – pattern testers received the pattern as a print-at-home style pdf that many of you will be familiar with from BurdaStyle…but I cheated and assembled my pattern pieces in Photoshop and printed them out on a large format printer that may or may not be conveniently located at my place of work 😉

I selected ‘view B’ and the button tabs option for the waist band.
Right, back to the fabric: I knew I would find a fabric in my stash because I find it easy to spot fabrics that I think would be great for skirt and stashing it. This made it a hard decision because I own a lot of great prints with good weight/drape for this style skirt.

Lightweight Cotton (Potters), Vintage Lace (new to the stash, Fabrics Direct) Cotton Sateen (Spotlight), Japanese Cotton (Tesutti), Japanese Cotton/Linen (Tessuti), Heavy Japanese Cotton (Tessuti)
I loved all the possible skirt images I made up to help me choose…so that wasn’t very helpful in the end 😉

Sewaholic Hollyburn Skirt Fabric Options
Photoshop instructions here, Gimp instructions here.
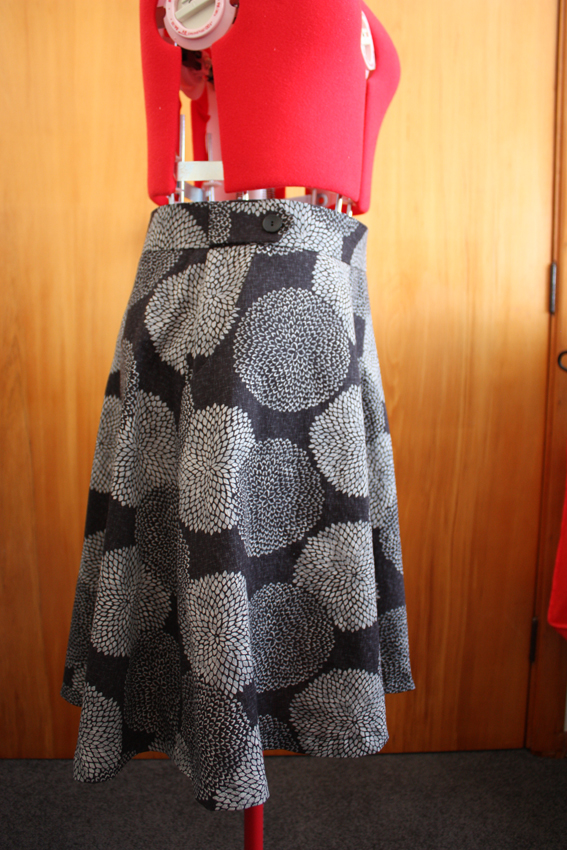
So I went for the fabric with the best drape which was a Japanese cotton/linen that I bought from Tesutti in Melbourne in August 2010 – It has matured well in the stash.
My next decision was to cut the skirt front on-the-fold to eliminate the centre front seam and avert any potentially regrettable pattern twinning…large circular flowers have a bad habit of joining at the seam in the most embarrassing of ways!
In general I am not a huge fan of centre front seams on skirts and dresses but I can understand the reasoning that they save you lots of fabric but in this case removing that seam was critical. I have learnt that when it comes to pairing fabric selection with sewing pattern the scale of your fabrics print and the number/placement of seams in your pattern is really important.
It is not a difficult thing to do at all, just fold over (or cut off) the edge that is marked “centre front seam” the width of the seam allowance, in this case, 1.5cm then place that edge on the fold. For future reference I suggest you re-label that piece so you don’t forget when you next pull out this pattern!
My fabric was only 110cm wide and I had 2.0 meters of it – cutting the front on the fold meant I had just enough for the rest of the skirt!

I didn’t take any WIP photos because I wanted to just get this skirt sewn up and my photos back to Tasia asap, it’s not like I could share them with you anyway 😉
I did stumble a little during the construction – doubt set in when I first tried it on, un-hemmed, about how flattering this style of skirt was for me. This then dominoed into my doubting my birthday dress selection because that is also a flared skirt.
I pushed on though, inserted the zipper (I went for an invisible one), and started playing with the hem length and in the end I hemmed my skirt shorter than ‘view B’ but not as short as ‘view C’, if that makes any sense! 🙂
The key with this skirt, I think, is to find the hem length that flatters you the most and the basic overall shape makes this an easy customisation to play with.
Ok, you guys want to see some pics?


I wore my skirt just like this to work the next day and received two unsolicited complements so I took that as a good sign.


These are the photos I sent to Tasia. I wish I wasn’t feeling so crappy otherwise I would have taken some new photos outside in the garden…but also our grass looks terrible while we painstakingly kill off of all the clover and broad-leaf weeds that have been left to takeover the lawn for far too long… yucky dead brown circles everywhere = not so photogenic!

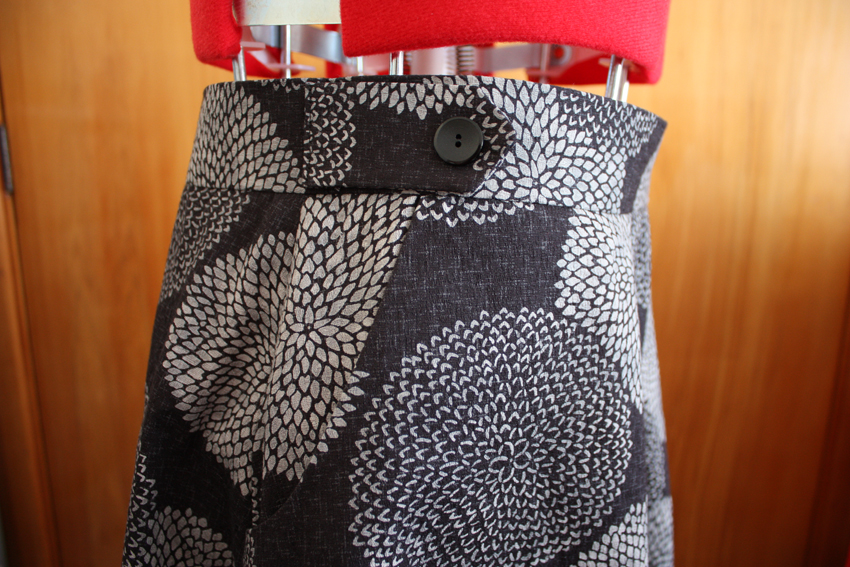
There was some twinning at the CB seam but is not that bad at all.
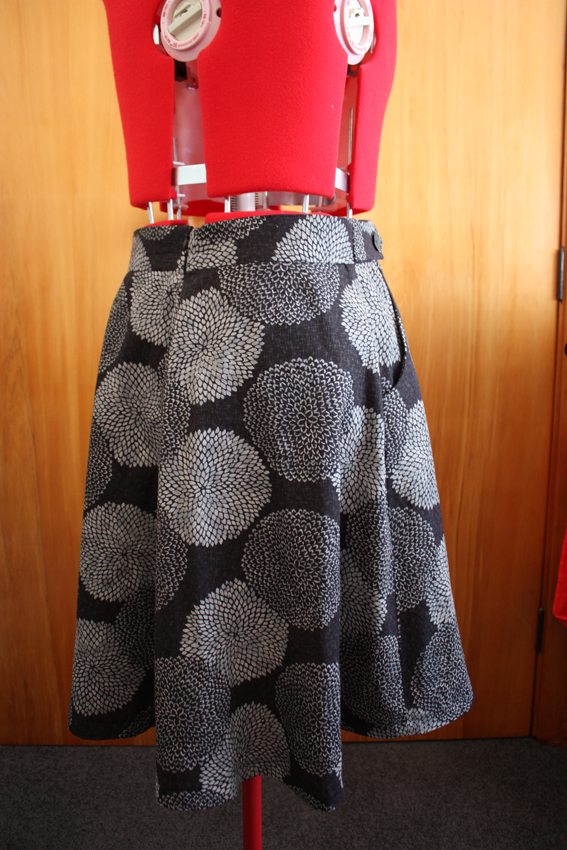
I went with a simple black button on the tabs because I think the fabric does enough work for this skirt.
I think this pattern would look great in most fabrics and amazing in a solid colour too, see Tasia’s photos on the pattern shop page here. You could also choose a contrast for the pockets and/or waist band and even widen the waist band and add some boning for a more dramatic waistline.
This pattern is great for the new seamstress as the instructions are extra thorough with lots of clear diagrams.
Ok, last photo, promise:


I am so glad I found your post. I’ve been wanting to make the Hollyburn skirt and the only thing I didn’t like was that there was a center seam in the front but thanks to you I know how to remove it! Can’t wait to get started!
Hi there, I totally love your version of the Hollyburn! I was also considering cutting my Hollyburn front on the fold so that I don’t have to worry about pattern matching, so your post was very useful for me. Can you tell me please, did you have to change the grain of the back pieces or did you just cut those out as per the instructions?
Hi Sarah, thanks 🙂 I’m glad my post helped you decide. I didn’t change the back grain at all, it didn’t seem to change the hang of the skirt. My fabric was very flowy, so that might have helped 🙂
Thanks! 🙂
Pingback: Introducing indie pattern lover – Mel from The Curious Kiwi! | Modern Vintage Cupcakes
Your skirt looks fabulous! You have to make more of them!
There are plans, don’t worry 😉
It looks great in bold prints! I don’t have any skirt in prints, it’s about time to make another. Also I’m jealous of your print fabric stash! ^^
Thanks 🙂 It’s so much fun to see all the different pattern testing versions!
Lovely 🙂
Thanks xx
So cute and it looks hip friendly! I love it!
It is definitely hip friendly, you just select your size based on your waist measurement and the rest will fit! So easy 🙂
I really do love the fabric you used! And you already know I love your version 😉 Have you worn it much since finishing it?
Thanks, I have worn it at least once a week, I want to make a black winter version of view C for wearing with coloured tights and boots!
I already have black fabric for another one! I had bought it for a half circle skirt, but will just use it for this; close enough!
Cute skirt! Love your twirl pic 🙂
This is the first time I have tried to do a twirly pic, it was fun! 🙂
Waw! this looks so great!The length is great. I love the hole thing :). I want so much a skirt like that now.
It is such a great skirt, and fast to make too, you should definitely get yourself this pattern 😀
Love a bold print skirt! In black and white, even more so! The lines of this one are very flattering…not surprised you got compliments 🙂
Go Team Black & White Bold Prints! 🙂 Thanks xx
Oh my gosh I love it!!!
I really want this skirt, But I already have so much I need to make. Grr! lol. I love the pattern and the length too!
You know I think it only took me about 2 hours total to sew this up, it is a really quick (and satisfying) make, nothing like a bit of stitched gratification to keep the sewing-mojo alive! 🙂
Great looking skirt, and nary a pattern placement faux pas in sight. Good thinking cutting on the fold 🙂
Haha, thanks, yes, beware the inappropriate pattern faux pas!
Very cute! You picked a great length!
Thanks 🙂